By: Team T09-4 Since: Oct 2018 Licence: MIT
1. Introduction
Welcome to the Developer Guide for Car Park Finder!
Car Park Finder is an application to find Housing Development Board (HDB) car parks in Singapore. It allows the user to work with a Command Line Interface (CLI) to display a list of car parks just by simply typing.
It enables the following:
-
Viewing of car park information through typing.
-
Searching and filtering by location and keywords.
-
Notification of a car park if the user chooses to.
2. Setting up
This section describes the steps needed to set up the application.
2.1. Prerequisites
-
JDK
9or laterJDK 10on Windows will fail to run tests in headless mode due to a JavaFX bug. Windows developers are highly recommended to use JDK9. -
IntelliJ IDE
IntelliJ has Gradle and JavaFx plugins installed by default.
Do not disable them. If you have disabled them, go toFile>Settings>Pluginsto re-enable them.
2.2. Setting up the project in your computer
-
Fork this repository and clone the fork to your computer
-
Open IntelliJ (if you are not in the welcome screen, click
File>Close Projectto close the existing project dialog first) -
Set up the correct JDK version for Gradle
-
Click
Configure>Project Defaults>Project Structure -
Click
New…and find the directory of the JDK
-
-
Click
Import Project -
Locate the
build.gradlefile and select it. ClickOK -
Click
Open as Project -
Click
OKto accept the default settings -
Open a console and run the command
gradlew processResources(Mac/Linux:./gradlew processResources). It should finish with theBUILD SUCCESSFULmessage.
This will generate all resources required by the application and tests. -
Open
XmlAdaptedCarpark.javaandMainWindow.javaand check for any code errors-
Due to an ongoing issue with some of the newer versions of IntelliJ, code errors may be detected even if the project can be built and run successfully
-
To resolve this, place your cursor over any of the code section highlighted in red. ALT+ENTER and select
Add '--add-modules=…' to module compiler optionsfor each error
-
-
Repeat this for the test folder as well (e.g. check
XmlUtilTest.javaandHelpWindowTest.javafor code errors, and if so, resolve it the same way)
2.3. Verifying the setup
-
Run the
seedu.parking.MainAppand try a few commands -
Run the tests to ensure they all pass.
2.4. Configurations to do before writing code
Here are some tips to before writing code for an easier time.
2.4.1. Configuring the coding style
This project follows oss-generic coding standards. IntelliJ’s default style is mostly compliant with ours but it uses a different import order from ours. To rectify,
-
Go to
File>Settings…(Windows/Linux), orIntelliJ IDEA>Preferences…(macOS) -
Select
Editor>Code Style>Java -
Click on the
Importstab to set the order-
For
Class count to use import with '*'andNames count to use static import with '*': Set to999to prevent IntelliJ from contracting the import statements -
For
Import Layout: The order isimport static all other imports,import java.*,import javax.*,import org.*,import com.*,import all other imports. Add a<blank line>between eachimport
-
Optionally, you can look at how to configure Intellij to check style-compliance as you write code.
2.4.2. Setting up CI
Set up Travis to perform Continuous Integration (CI) for your fork. See how to setup Travis to learn how.
After setting up Travis, you can optionally set up coverage reporting for your team fork (see using Coveralls).
| Coverage reporting could be useful for a team repository that hosts the final version but it is not that useful for your personal fork. |
Optionally, you can set up AppVeyor as a second CI (see using AppVeyor).
| Having both Travis and AppVeyor ensures your App works on both Unix-based platforms and Windows-based platforms (Travis is Unix-based and AppVeyor is Windows-based) |
3. Design
To understand the design architecture and how various components of the system works, please read through the entirety of Section 3.
3.1. Architecture overview
Instead of delving straight into the individual components, take a look at the overarching design architecture used by the entire system.
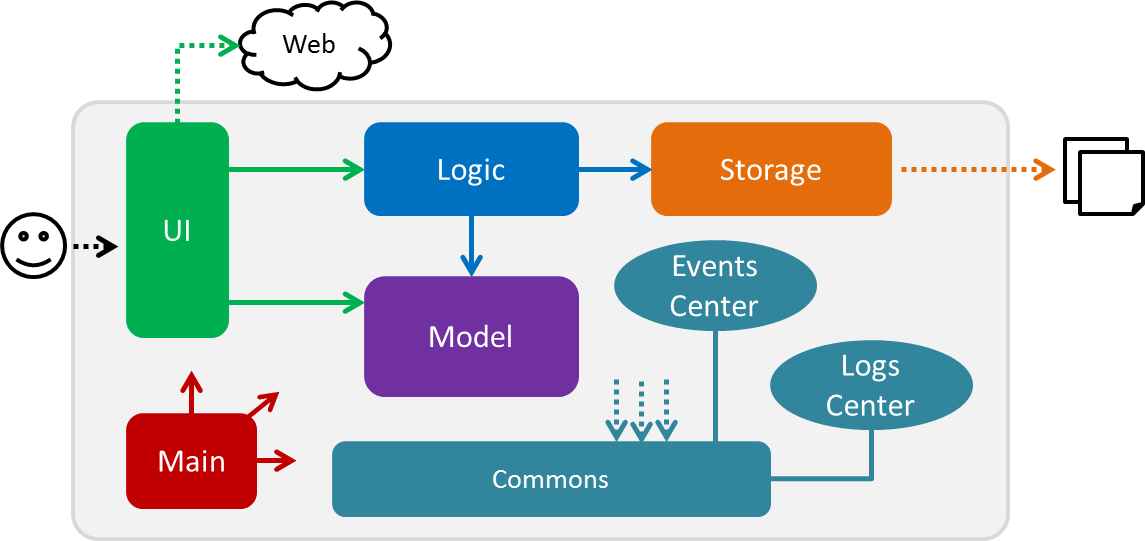
Figure 1 explains the high-level design of Car Park Finder,
which contains six architecture components and
adopts an events-driven nature.
3.2. Architecture components
Table 1 below briefly introduce the function of each architecture components as well as common behaviours.
| Component | Main Function |
|---|---|
The starting point of the system, which encapsulates the other components. |
|
Represent a collection of classes used by multiple components. |
|
Contain the user interface classes used by the application. |
|
Execute user commands, also known as the command executor. |
|
Hold the data of the application in-memory. |
|
Allow reading and writing of data to the hard disk. |
|
For User Interface, Logic, Model and Storage components, each of them:
|
For example, the Logic component (see the Figure 2 below) defines it’s API in the Logic interface
and exposes its functionality using the LogicManager class.
3.3. Events-driven nature of the design
This section explains the main nature of design adopted by the system.
Figure 3 below shows how the components interact when the user issues the command query.
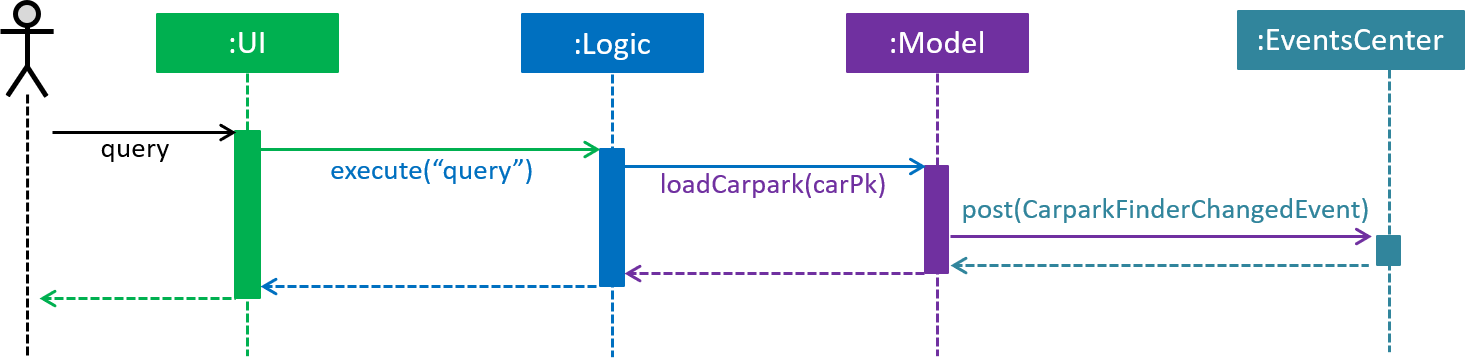
query command
Note how the Model simply raises a CarparkFinderChangedEvent when Car Park Finder data are changed, instead of
asking the Storage to save the updates to the hard disk.
|
Figure 4 below shows how the EventsCenter reacts to that event, which eventually results in
the updates being saved to the hard disk and the status bar of the User Interface being updated to reflect the 'Last Updated' time.
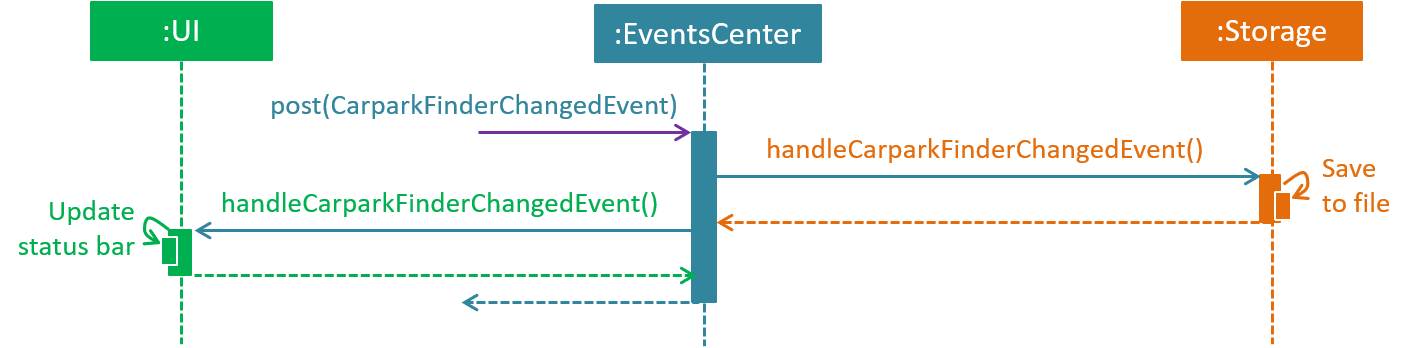
query event handling
Note how the event is propagated through the EventsCenter to the Storage and UI without Model having to be
coupled to either of them. This is an example of how the Event Driven approach helps us reduce direct coupling between components.
|
The sections below give more details of each component.
3.4. Main component
The Main component consists of only one class, MainApp.
It is responsible for:
-
At application launch: initializes the components in the correct sequence, and connects them with one another.
-
At shut down: shuts down the components and invokes cleanup methods where necessary.
3.5. Commons component
The Commons component consists of classes used by multiple other components. Two of these classes play important roles
at the architectural level.
-
EventsCenter: This class (written using Google’s Event Bus library) is used by components to communicate with other components using events (i.e. a form of Event Driven design) -
LogsCenter: Used by many classes to write log messages to the App’s log file.
| Classes used by multiple components are put in the seedu.carparkfinder.commons package. |
3.6. User interface component
The User Interface (UI) component consists of a MainWindow that is made up of different parts.
The base class
Ui.java uses JavaFx UI framework.
Please refer to Figure 5 below for more details on how they are connected.
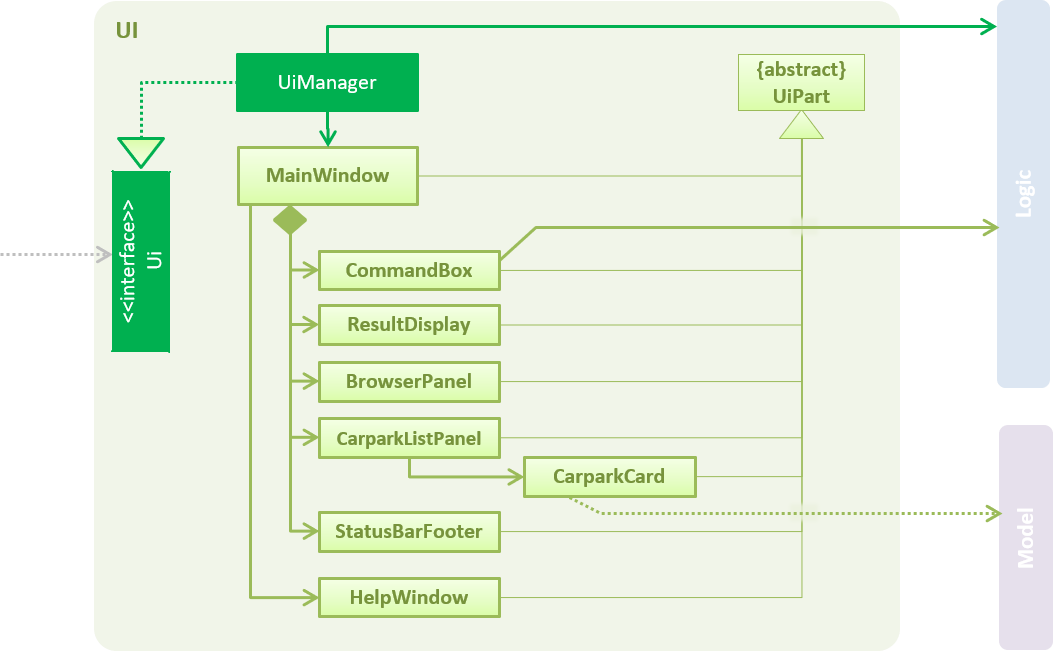
In general, this is the workflow of the UI component:
-
Execute user commands using the
Logiccomponent. -
Bind itself to some data in the
Modelso that theUIcomponents can auto-update when data in theModelchange. -
Respond to events raised from various parts of the App and updates the
UIcomponents accordingly.
All UI parts, including the MainWindow, inherit from the abstract UiPart class. The layout for each
component is defined in matching .fxml files and can be found in the src/main/resources/view folder.
For example, the layout of the MainWindow
is specified in MainWindow.fxml.
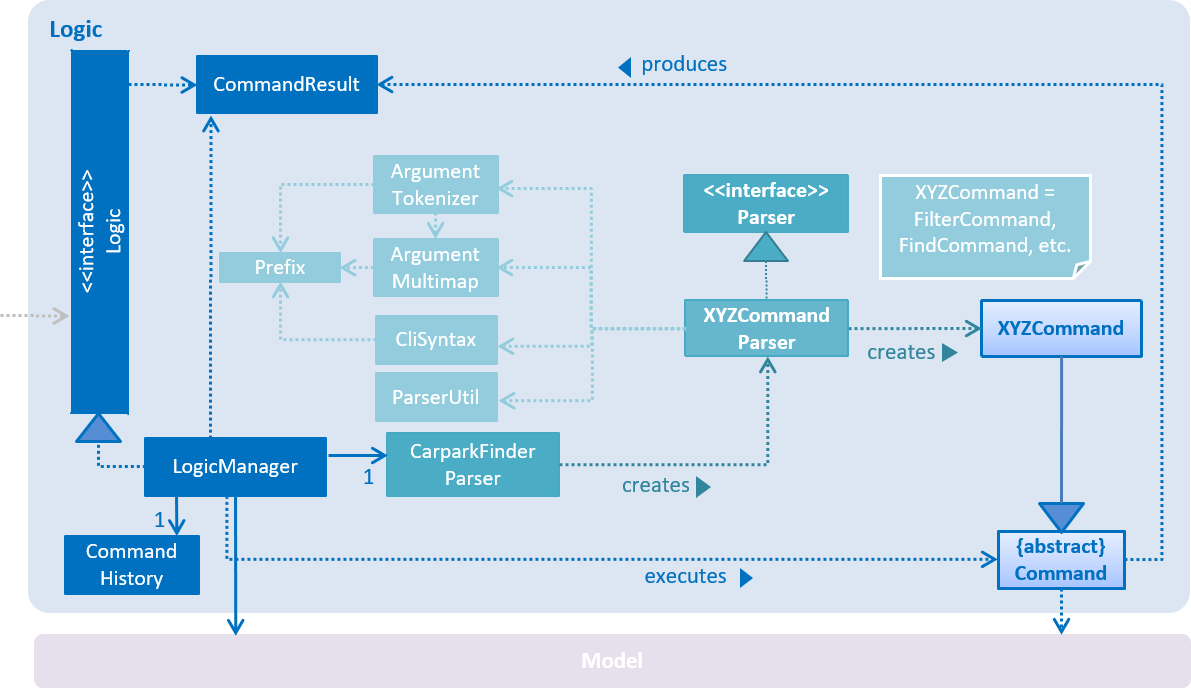
3.7. Logic component
The Logic component consist of a LogicManager that takes care of the parse and exexcution of commands.
It inherits the base class Logic.java.
Please refer to the class diagram below for more details on how they are connected.
In general, this is the workflow of the Logic component:
-
Get the
CarparkFinderParserclass to parse the user command. -
Create a
Commandobject which is executed by theLogicManager. -
Pass the result of the command execution over to
Model, which can affect it (e.g. adding a person) and/or raise events. -
Return the command execution by encapsulating the command as a
CommandResultobject which then is passed back to theUI.
Figure 7 below shows the interactions within the Logic component
when execute("find Y9") is called.
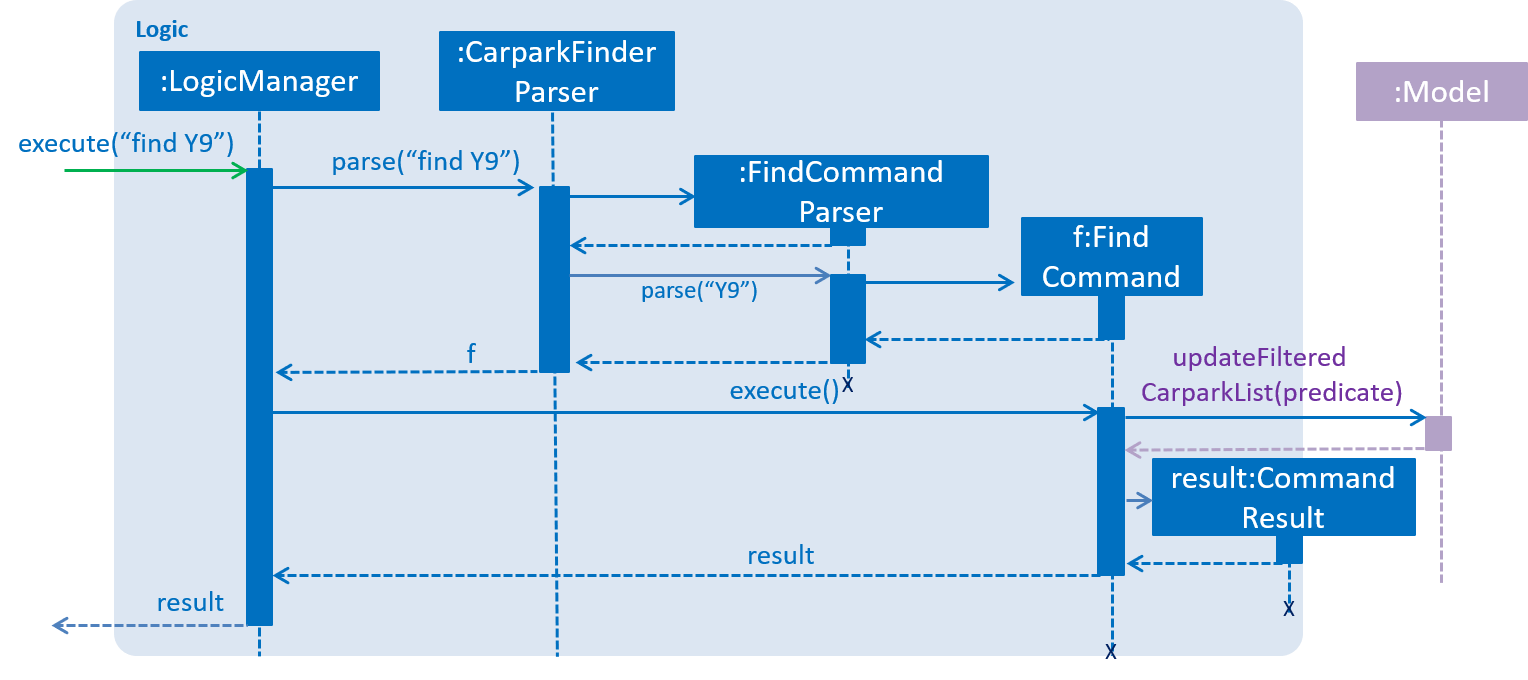
find Y93.8. Model component
The Model component is managed by the ModelManager that stores the data of Car Park Finder.
It does not depend on any of the three other components.
Model.java is the base class.
Please refer to Figure 8 below for more details.
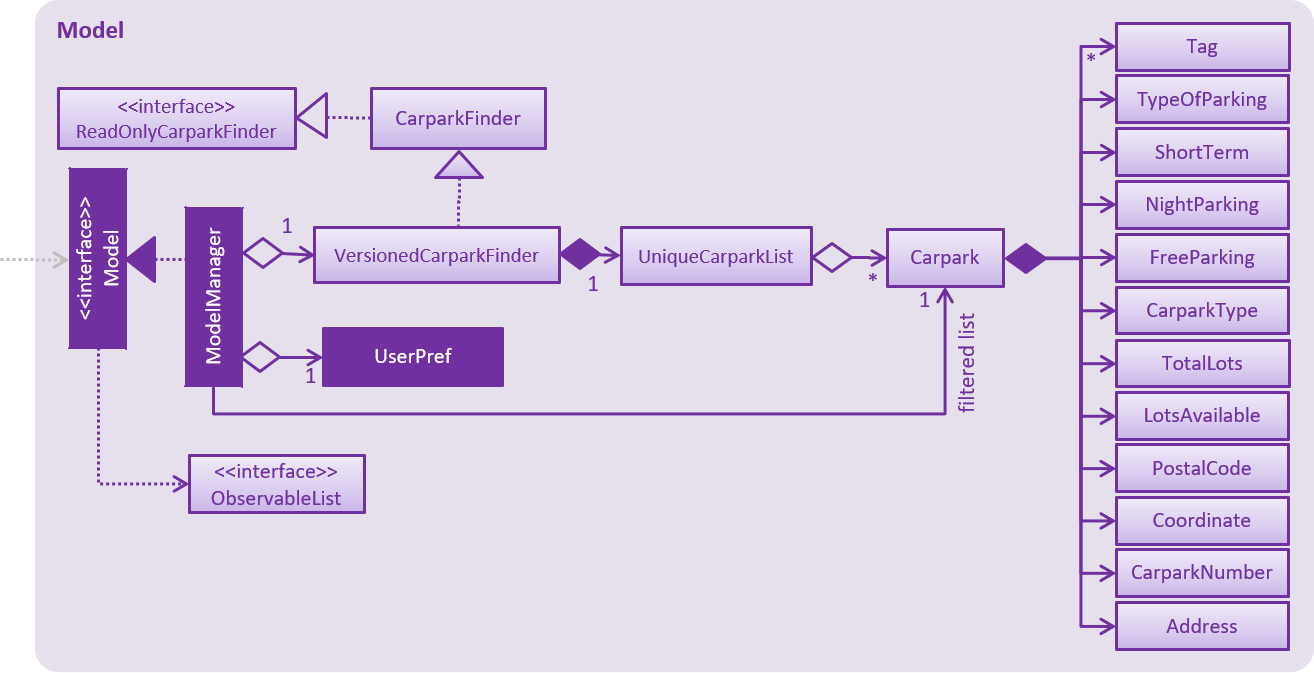
In general, this is the structure of the Model Component:
-
The
ModelManagerextends theModelInterface. -
It stores a
VersionedCarparkFinderand aUserPrefobject.-
The
UserPrefobject represents the user’s preferences. -
The
VersionedCarparkFindercontains acarparkFinderStateListwhich is used to store multipleCarparkobjects.
-
-
The
ModelManageralso manages a filtered list ofCarparkobjects filtered from thecarparkFinderStateList. -
The
Model componentexposes an unmodifiableObservableList<Carpark>that can be 'observed' e.g. the UI can be bound to this list so that it automatically updates when data in the list changes.
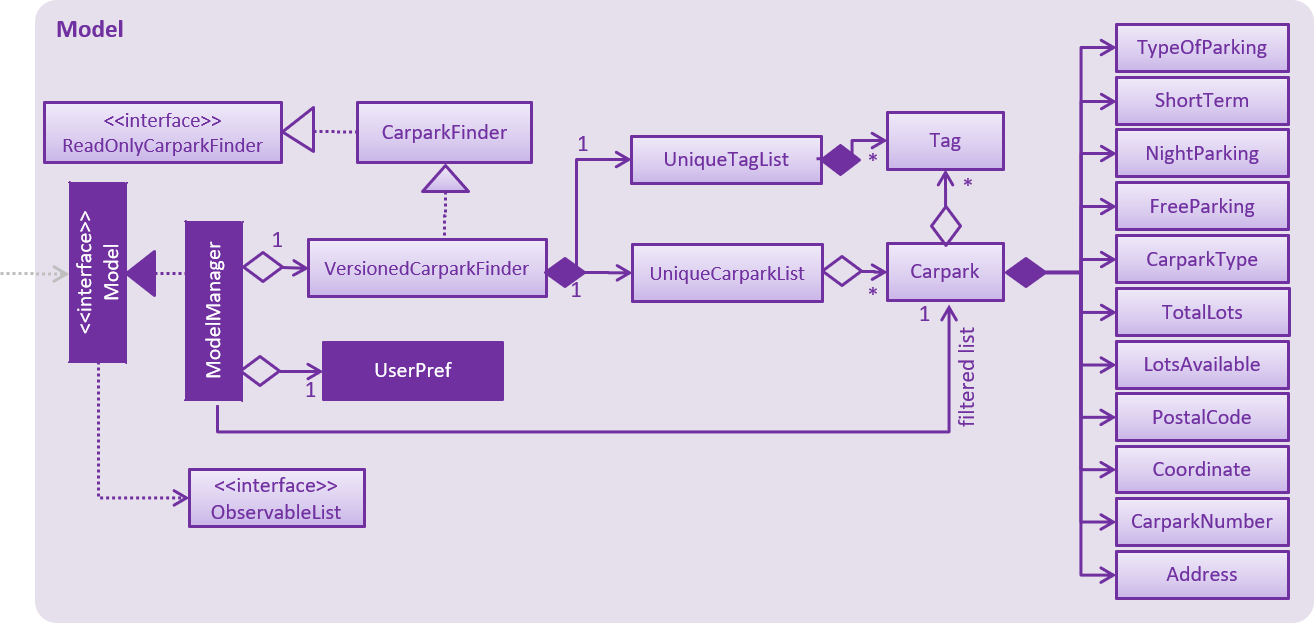
As a OOP model, we can store a Tag list in Car Park Finder, which Carpark can reference.
This would allow Car Park Finder to only require one Tag object per unique Tag, instead of
each Carpark needing their own Tag object. Figure 9 is an example of how such a model may look like.
|
3.9. Storage component
The Storage component, managed by the StorageManager, serves as a backend storage for data of Car Park Finder.
Storage.java is the base class.
Please refer to Figure 10 below for more details on how they are connected.
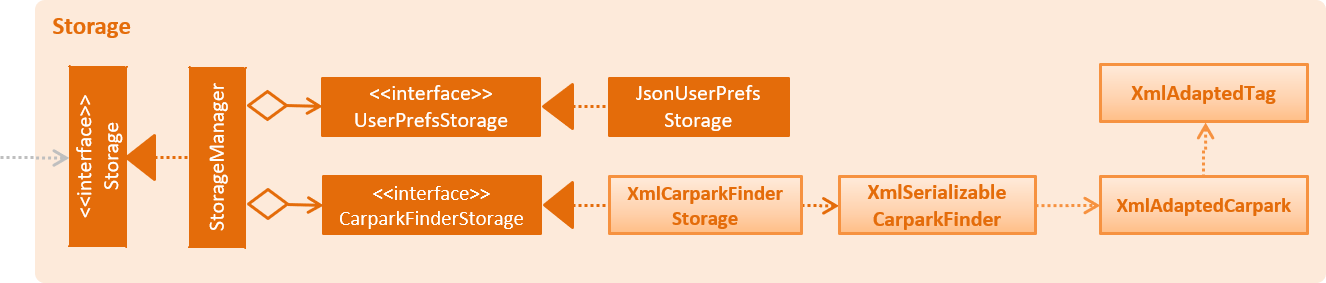
The Storage component can perform the following functions:
-
save
UserPrefobjects in json format and read it back. -
save the Car Park Finder data in xml format and read it back.
4. Implementation
Implementation of features will be described here. This is not meant to be exhaustive, so only the noteworthy details will be mentioned.
4.1. Query feature
The query feature updates the information of every car park using the latest information provided by data.gov.sg database.
4.1.1. Overview
The mechanism does an API call to the website data.gov.sg to obtain car park information in JSON format.
An external library Gson is used to parse the data in GsonUtil. The data is stored internally as a CarparkJson object.
Some notable methods that GsonUtil implement are:
-
GsonUtil#getCarparkData()— Get the basic car park information from the API. -
GsonUtil#getCarparkAvailability()— Get the total number of parking lots as well as the availability of the parking lots from another API. -
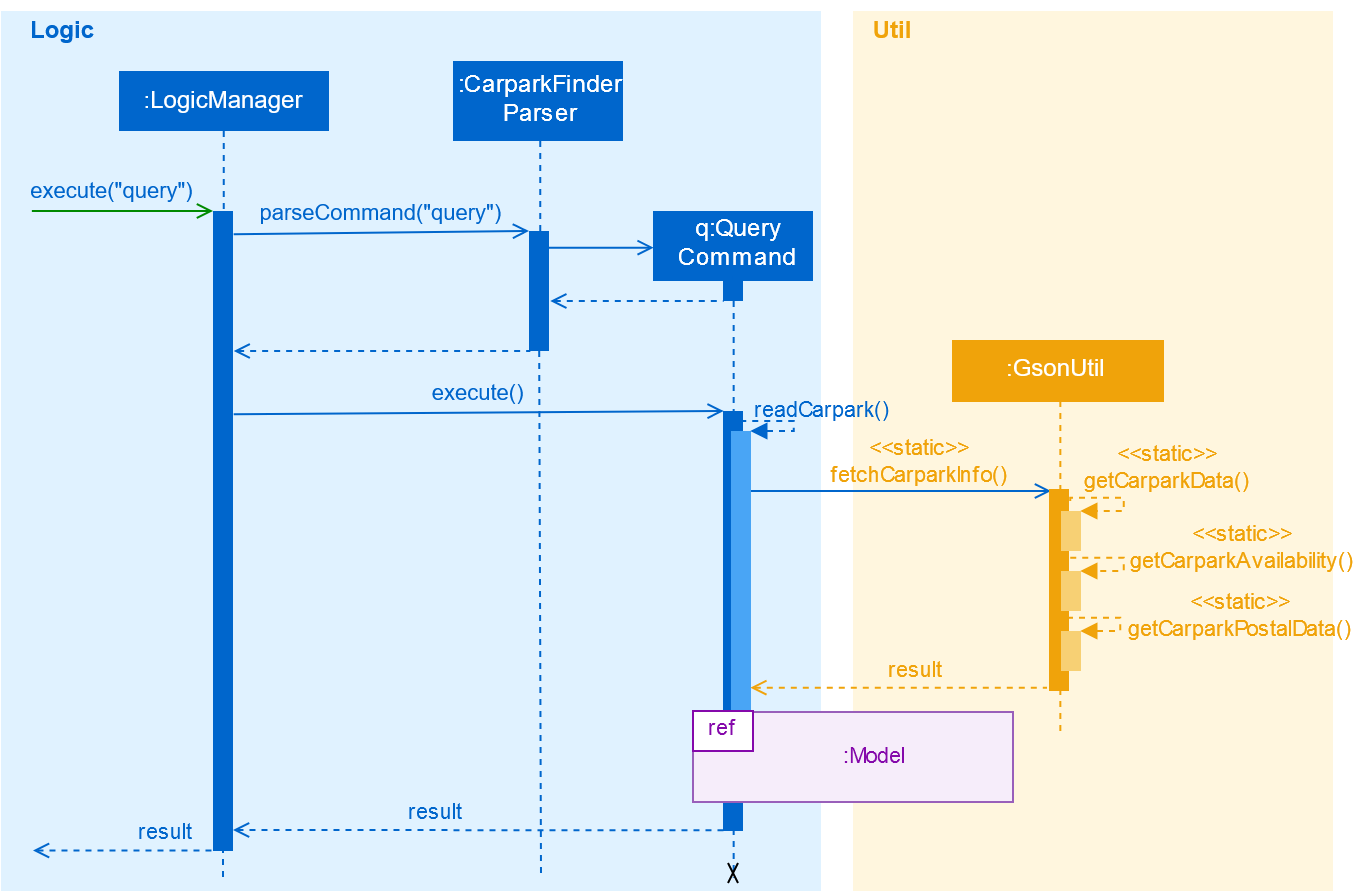
GsonUtil#fetchCarparkInfo()— Return a list of car parks with populated data. -
GsonUtil#loadCarparkPostalCode— Return a list of postal code information, with hashed coordinate data.
Only GsonUtil#fetchCarparkInfo() is used in QueryCommand, inside QueryCommand#readCarpark() method.
| A local copy of the data is saved at the end. Users only need to execute this command if they want to get the most recent information from the database. |
4.1.2. Example
Given below is an example usage scenario of how the query mechanism behaves at each step.
Step 1. The user launches the application, where the initial state of Car Park Finder is not up-to-date with the latest data published by data.gov.sg.
Step 2. The user executes the query command to fetch the latest data. The query command calls
GsonUtil#fetchCarparkInfo() which in turn runs GsonUtil#getCarparkData() and GsonUtil#getCarparkAvailability().
Step 3. The user waits for data to be updated. GsonUtil#getCarparkData() establishes a connection with the API
to read JSON data containing basic car park information.
Step 4. The JSON data is parsed using Gson library and stored inside CarparkJson. A HashSet is used to consolidate
all the car parks and prevent duplicate entries.
Step 5. Once GsonUtil#getCarparkData() is done getting all the basic car park information,
GsonUtil#getCarparkAvailability() retrieves additional details of the parking lot. The process is similar to how GsonUtil#getCarparkData() retrieves data from the API.
Step 6. GsonUtil#getCarparkAvailability() appends the additional the parking lot details using CarparkJson#addOn()
|
The loading of postal code, |
Step 7. Next, a final check is done to see if there is any car park with no parking lot data. The value '0' is added if there is no data.
Step 8. Finally an ArrayList<ArrayList<String>> is returned from GsonUtil#fetchCarparkInfo() to update the car park finder state.
The line of text at the bottom of the application then will show that the application is updated.
|
If |
Please refer to the Figure 11 below for how the query operation works.
For more details on the internal workings of Model, please refer to Undo/Redo.
|
4.1.3. Design Considerations
To find out why certain designs were chosen for the query feature, please read the following section for the explanation and reason behind such choices.
Aspect: How query executes
-
Alternative 1 : Wait for data to be queried sequentially.
Pros
No side effects as everything is done sequentially. If an error occurred, it is easy to trace the source.
Cons
The application hangs while data is being queried due to long processing time.
-
Alternative 2 (current choice) : Data is queried using a separate thread.
Pros
Application can provide feedback to the user as the data is being fetched in the background.
Cons
Reading the car park list while querying might cause unintended side effects if not handled properly.
Aspect: Data structure to support query command
-
Alternative 1 (current choice): Use
ArrayList<ArrayList<String>>to store car park information.Pros
Easy to maintain and iterate through an array list of array lists to get a specific car park.
Cons
Using an
ArrayList<ArrayList<String>>can be confusing and unintuitive. Accessing elements is also not that efficient. -
Alternative 2 : Use a
HashMap<String,Carpark>to store data.Pros
Much more efficient in accessing elements by using a key and better code readability.
Cons
HashMapdoes not provide an ordered collection. Since order of insertion is not known, the output for the list of car parks might be different every time.
4.2. Find feature
The find feature searches for a car park by keyword or location.
4.2.1. Overview
The find mechanism is facilitated by FindCommand and FindCommandParser. It extends Command and implements the following operations:
-
FindCommand#execute()— Executes the command by running a predicateCarparkContainsKeywordsPredicateto update the car park list.
The find mechanism is supported by FindCommandParser. It implements Parser and contains the following operations:
-
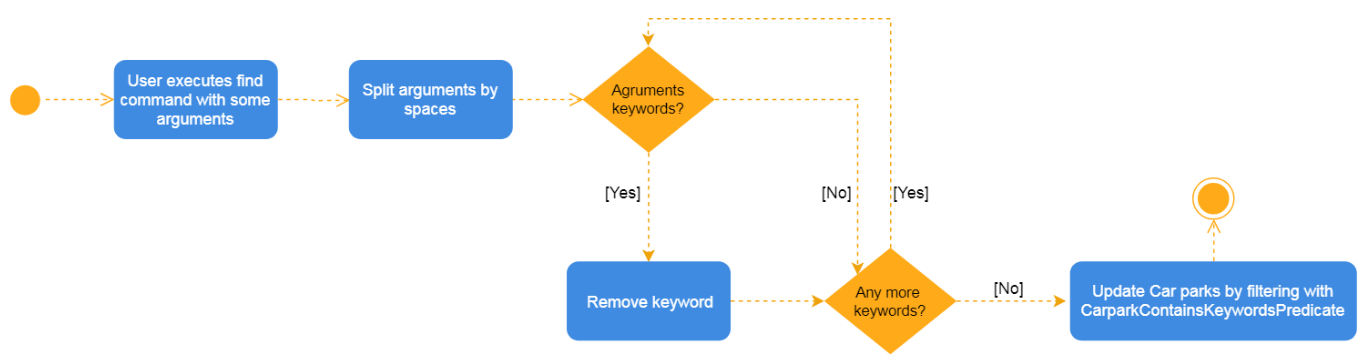
FindCommandParser#parse()— Checks the arguments for empty strings and throws aParseExceptionif empty string is found. It then splits it by one or more white spaces. It then removes any strings in the list of common words.
The predicate CarparkContainsKeywordsPredicate takes in a list of strings and checks if any of the strings matches the name or address of a car park fully or partially.
The diagram above describes how the flow of a find command would execute. It rely on FindCommandParser to ensure the variables are correct.
4.2.2. Example
Given below is an example usage scenario of how the find mechanism behaves at each step.
Step 1. The user launches the application for the first time.
Step 2. The user executes find punggol command to get all car parks in punggol.
The find command calls FindCommandParser#parse().
If a command execution fails, it will not call FindCommand#execute(), and the car park finder state will not be saved.
|
Step 3. The entire list of car parks is filtered by the predicate CarparkContainsKeywordsPredicate, which checks for the keyword punggol.
Step 4. The filtered list of car parks is returned to the GUI.
The flow chart below describes the user interaction with the application and how it processes it.
4.2.3. Design Considerations
Aspect: How predicate works
-
Alternative 1 (Current choice): Predicate have additional filter with an ignore list.
Pros
Re-usable functions introduced for partial checking.
Cons
Reading the car park list while querying might cause unintended side effects if not handled properly.
-
Alternative 2: Filter the data when it is taken in.
Pros
Easy to maintain as predicate will have lesser conditions.
Cons
Breaks OOP style as the parser will modify the data.
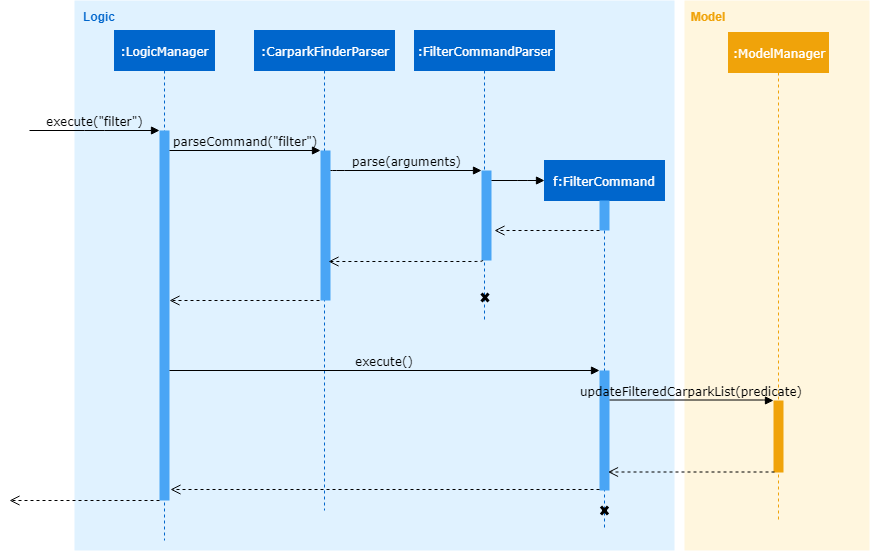
4.3. Filter feature
The filter feature allow users to find a suitable car park based on criteria that users input, within a certain area.
4.3.1. Overview
The filter mechanism is facilitated by FilterCommand and FilterCommandParser.
The filter mechanism can filter car parks by the following criteria. The corresponding flag of each criterion is also
indicated below.
-
Car park has available parking slots
a/ -
Car park has short-term parking
s/ -
Type of car park
ct/ -
Car park has free parking between a specified time period
f/ -
Car park has night parking
n/ -
Type of parking system that the car park uses
ps/
The FilterCommandParser extends Parser and implements the following operation:
-
FilterCommandParser#parse()— Splits the arguments by white spaces and store them into an array list. Parser then checks the validity of the arguments input by user, and throws aParseExceptionwhen arguments are deemed invalid in various ways.
The FilterCommand extends Command and implements the following operation:
-
FilterCommand#execute()— Executes the command by filtering the car park list withCarparkFilteringPredicate.
The FilterCommand is able to filter car parks by multiple criteria at a time.
4.3.2. Current Implementation
Given below is an example usage scenario of how the filter mechanism behaves at each step when filtering with the following criteria:
-
car park is covered
-
car park has free parking between Sunday 11.30am and 3.30pm
-
car park currently has available parking slot
Step 1. The user launches the application.
Step 2. The user executes filter ct/ COVERED f/ SUN 11.30AM 3.30PM a/.
Input parameters can also be in lower case as FilterCommandParser will convert input parameters to upper case
if they are not.
|
Step 3. After CarparkFinderParser detects filter as the command word, a
FilterCommandParser is created to parse the arguments supplied to the command.
Step 4. The FilterCommandParser splits the arguments by white spaces and store them into List<String> argumentsList.
Step 5. Then, it identifies the flags present in List<String> argumentsList and store them in List<String> flagList.
If List<String> flagList is empty, FilterCommandParser throws a ParseException to indicatte that the command has invalid parameters.
|
Step 6. FilterCommandParser also parses the parameter(s) of each flag, and throws ParseException when necessary.
-
ct/:FilterCommandParserensures thatCOVEREDis a valid car park type. -
f/:FilterCommandParserensures thatSUNis a valid day and11.30AMand3.30PMare valid times. Moreover,FilterCommandParserensures that all three parameters are present.
Step 7. Parameters of ct/ and f/ are packaged into CarparkTypeParameter carparkTypeParameter and
FreeParkingParameter freeParkingParameter respectively. They are then passed to a newly created FilterCommand
together with List<String> flagList.
Step 8. The FilterCommand object obtains the last predicate used by FindCommand from model and creates the CarparkFilteringPredicate.
The ModelManager stores the last predicate used by FindCommand. The predicate is updated every time FindCommand is executed.
|
Step 9. Besides filtering by the last predicate used by FindCommand (location), CarparkFilteringPredicate has a
series of if statements that checks which flags are present in List<String> flagList, before looking into
the parameters of the flags.
-
For
a/:CarparkFilteringPredicatechecks that the car park has available parking slots. -
For
ct/:CarparkFilteringPredicatechecks that the car park type of the car park isCOVERED. -
For
f/:CarparkFilteringPredicatechecks that the car park has free parking on Sunday, and the start and end time input by the user falls between the free parking time period of the car park.
Step 10. To combine the filtering criteria, a boolean variable, collective, is used. The following snippet of code shows more clearly how it is used.
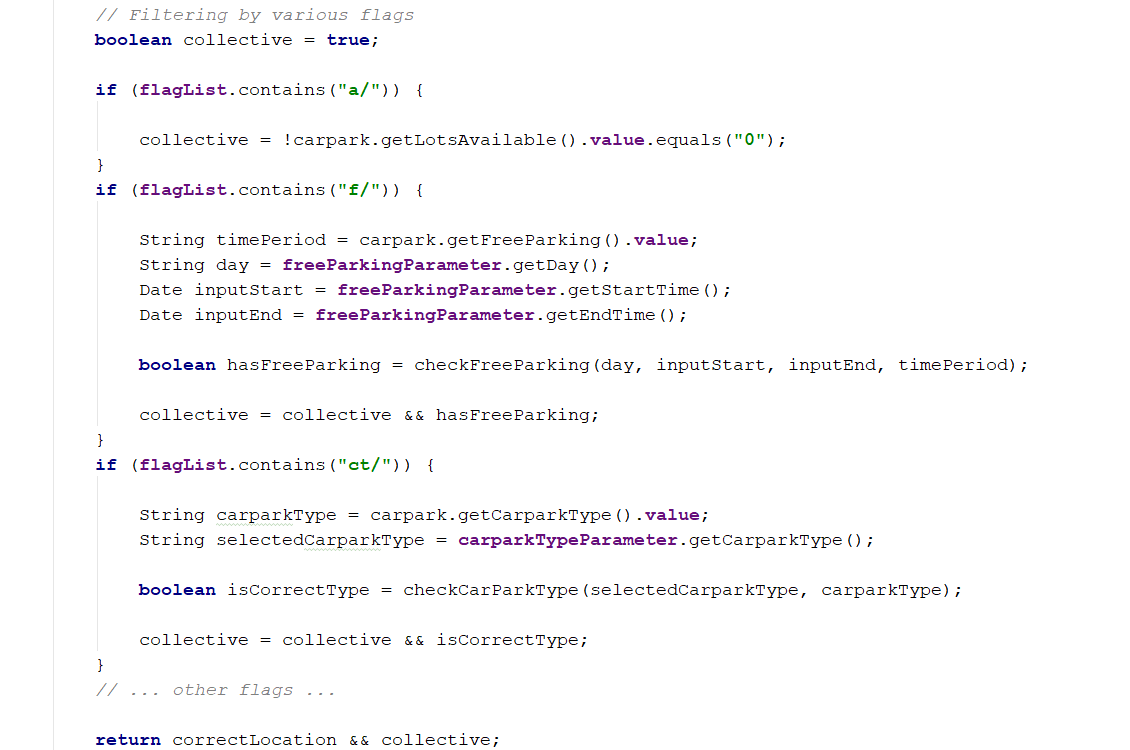
Step 11. The list of car parks is filtered against the predicate and returned to the GUI.
Please refer to the Sequence Diagram below for the filter operation.
4.3.3. Design Considerations
Aspect: How location based filtering is done
-
Alternative 1 (Current choice): Combining the location predicate from the previous
FindCommandto form the predicate for the currentFilterCommandPros
Able to accomplish location-based filtering with less modification to existing code structure.
Cons
Less efficient as the list of car park needs to be filtered by an additional parameter.
-
Alternative 2: Store the filtered list of car parks from
FindCommand, then filter from there.Pros
Improved efficiency as a shorter list of car park needs to be filtered by
FilterCommand.Cons
Additional memory required to store the list of car park generated by
FindCommand. A whole new set of classes and methods needs to be written to store the filtered list, might over-complicate code.
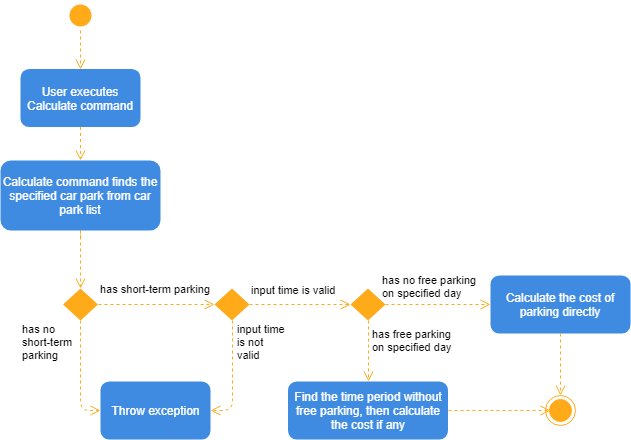
4.4. Calculate feature
The calculate feature helps users calculate the cost of parking at a specific car park for a specified time period.
4.4.1. Overview
The calculate mechanism is facilitated by CalculateCommand and CalculateCommandParser.
4.4.2. Current Implementation
Given below is an example usage scenario of how the calculate mechanism behaves at each step when the user wants to know the cost of parking at car park W49, on a Monday, from 9.00am to 5.30pm.
Step 1. The user launches the application.
Step 2. The user executes calculate W49 SUN 9.00AM 5.30PM.
Step 3. After CarparkFinderParser detects calculate as the command word, a CalculateCommandParser is created to
parse the arguments supplied to the command.
Step 4. The CarparkFinderParser splits the arguments by white spaces, then creates a CalculateCommand object.
Step 5. CalculateCommand creates a CarparkIsOfNumberPredicate to find the specified car park, car park W49, from
the list of car parks.
Step 6. CalculateCommand checks if the car park W49 has short-term parking.
Step 7. As some car parks only has short-term parking between certain timings, CalculateCommand checks if the parking time input by the user is valid.
Step 8. After which CalculateCommand checks of there is free parking on Monday between the specified time. Since there
is no free parking during that time period, it will calculate the cost of parking by the standard rate of $0.60 per half an hour.
Step 9. The calculated cost is then returned to the GUI as a command result.
The following Activity Diagram summarizes the implementation of the calculate command.
4.4.3. Design Considerations
Aspect: How specified car park is identified and obtained from car park list
-
Alternative 1 (Current choice): Identify car park by car park number. Filter list of car parks by the car park number. Then obtain the car park from filtered list.
Pros
Command can be executed independently, as long as user knows the car park number of car park. Make use of existing filtering methods to obtain car park. Since car park number is unique to each car park, there would only be one car park left in filtered list if car park number is valid.
Cons
Less efficient as command needs to find the specific car park from all the car parks.
-
Alternative 2: Identify the car park by index from last filtered list.
Pros
Simple to implement, can directly obtain car park by obtaining the last filtered list from
modaland then using thegetmethod on the list.Cons
Command can only work after
FindCommandorFilterCommandis executed.
4.5. Notify feature
The notify feature updates the lot availability of the car park selected by the user. It also displays a notification message periodically to inform the user.
4.5.1. Overview
The notify mechanism is facilitated by NotifyCommand and NotifyCommandParser. It enables notifications at a given
interval and disables notification when it detects that the interval is set to '0'.
The NotifyCommandParser implements Parser with the following operation:
-
NotifyCommandParser#parse()— This checks the validity of the argument on whether it is non-negative integer and between 10 to 600, including 0. It throws aParseExceptionwhen then user input does not conform the expected format.
When notification is enabled:
-
NotifyCommandcallsScheduledExecutorService#scheduleAtFixedRate()to startNotifyTimeTask#run()and repeat the execution at a fixed interval. -
At every interval,
NotifyTimeTaskwill callGsonUtil#getSelectedCarparkInfo()to get the lot details from the API and update the specific car park usingCarpark#setLots(). -
It will also create an event called
NewResultAvailableEvent()to update the user on how many parking lots are available by displaying a message.
Take a look before at the code snippet below for more details on how NotifyTimeTask works.
@Override
public void run() {
    try {
        //...
        // Get the data from the database
        List<String> updateData = new ArrayList<>(GsonUtil.getSelectedCarparkInfo(
                selectedNumber.toString()));

        // Update the specific car park
        model.getCarparkFinder().getCarparkList().parallelStream()
                .filter(carpark -> carpark.getCarparkNumber()
                .equals(selectedNumber))
                .findFirst().ifPresent(carpark -> carpark.setLots(
                new LotsAvailable(updateData.get(1)), new TotalLots(updateData.get(2))));
        // This event updates the UI for the CarparkListPanel to account for any changes
        // in lotsAvailable variable
        EventsCenter.getInstance().post(new NotifyCarparkRequestEvent());
        model.commitCarparkFinder();

        // Check if notification is enabled
        if (CarparkListPanel.getTimeInterval() > 0) {
            // show notification...
        }
    }
    //...
}
4.5.2. Example
Given below is an example usage scenario of how the notify mechanism behaves at each step.
|
To enable it, |
Step 1. The user executes select 10 to select the 10th car park in the list.
Step 2. The user then executes notify 10, indicating the interval to be 10 seconds.
Step 3. The NotifyCommandParser#parse() gets called to parse the arguments supplied. It checks if the interval
is valid non-negative integer, in the range of 10 to 600 and including 0.
Step 4. A new instance of NotifyCommand is created by NotifyCommandParser, and the argument then gets stored as
int targetTime in NotifyCommand.
Step 5. Inside NotifyCommand, ScheduledExecutorService#scheduleAtFixedRate() starts NotifyTimeTask#run() with
targetTime as one of the parameters passed in. This sets NotifyTimeTask to run and repeat every targetTime.
Step 6. When NotifyTimeTask#run() is active, GsonUtil#getSelectedCarparkInfo() gets called and fetches the data
from the database. It returns the specific car park to be updated.
Step 7. To find which car park to be updated in the list, parallelStream() is used to filter through. Once it is found,
Carpark#setLots() gets called to update the TotalLots and LotsAvailable variables.
Step 8. To show that the list of car parks is updated, NotifyCarparkRequestEvent() and NewResultAvailableEvent() are
created to update the UI and display a message respectively.
Step 9. Every 10 seconds, the user will receive a notification on the number of available lots left for the 10th car park.
Step 10. The whole process will repeat itself starting from Step 6, until ScheduledExecutorService#shutdownNow() gets
called by notify 0 which disables notification.
|
Turning notification off goes through the same process as above, but instead of running
|
Figure 16 below summarises what happens when a user executes the notify command:
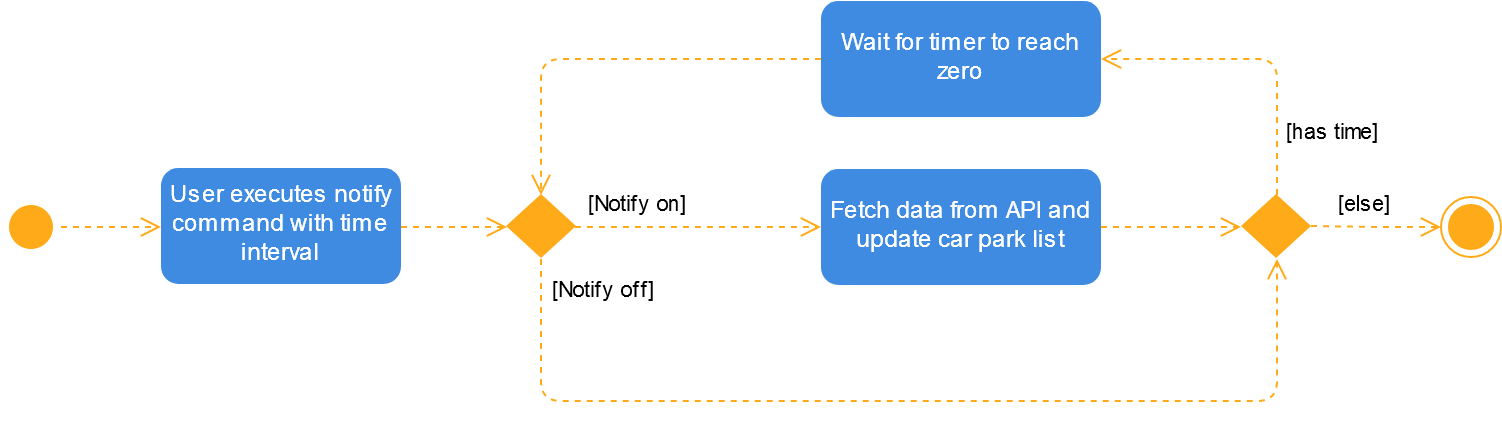
notify command4.5.3. Design Considerations
To find out why certain designs were chosen for the notify feature, please read the following section for the explanation and reason behind such choices.
Aspect: How notify executes
-
Alternative 1 : Set an interval for data to be queried sequentially.
Pros
No side effects as everything is done sequentially. If an error occurred, it is easy to trace the source.
Cons
Performance issues as the application might stall, despite only updating one car park.
-
Alternative 2 (current choice): Data is queried using a separate thread every interval.
Pros
Application can provide feedback to user as the data is being fetched in the background.
Cons
Reading the car park list while updating on a separate thread might cause unintended side effects if not handled properly.
Aspect: Class to run NotifyTimeTask
-
Alternative 1 : Use
Timerclass to run and scheduleNotifyTimeTask.Pros
Using
Timerclass allows fornotifyto run in the background thread and handles the repeated calls as well.Cons
If the user were to change the system clock, it might affect how
Timerclass works. This is because the class relies on the system time to calculate when to run the task again. -
Alternative 2 (current choice): Use
ExecutorServiceclass to run and scheduleNotifyTimeTask.Pros
ScheduledThreadPoolExecutorsupports the use of multiple threads, whereasTimeronly has one. Also,ScheduledThreadPoolExecutoris not affected by the system clock.Cons
Unable to handle more complex operations if the application continues to add more features. For example, handling updates to multiple car parks with different intervals.
4.6. Undo/Redo feature
The undo command changes the car park finder state to before the previous undoable command was executed.
On the other hand, the Redo command reverse the most recent undo changes.
4.6.1. Overview
The undo/redo mechanism is facilitated by VersionedCarparkFinder.
It extends CarparkFinder with an undo/redo history, stored internally as an carparkFinderStateList and currentStatePointer.
Additionally, it implements the following operations:
-
VersionedCarparkFinder#commit()— Saves the current car park finder state in its history. -
VersionedCarparkFinder#undo()— Restores the previous car park finder state from its history. -
VersionedCarparkFinder#redo()— Restores a previously undone car park finder state from its history.
These operations are exposed in the Model interface as Model#commitCarparkFinder(), Model#undoCarparkFinder() and Model#redoCarparkFinder() respectively.
Given below is an example usage scenario and how the undo/redo mechanism behaves at each step.
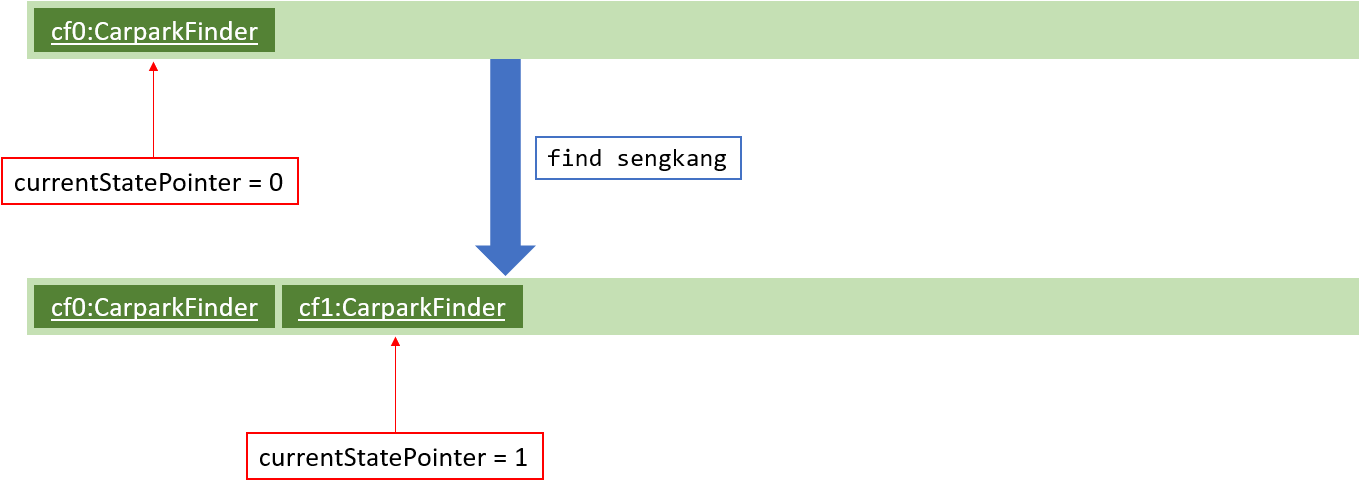
Step 1. The user launches the application for the first time. The VersionedCarparkFinder will be initialized with the initial car park finder state, and the currentStatePointer pointing to that single car park finder state.
Figure 17 below showcases the state at the start of the program.

Step 2. The user executes find sengkang command to find list of car park which contain sengkang from the car park finder. The find command calls Model#updateFilteredCarparkList(), causing the modified state of the car park finder after the find sengkang command executes to be saved in the carparkFinderStateList, and the currentStatePointer is shifted to the newly inserted car park finder state.
Figure 18 below shows a new state is created after the command find segkang is ran.
Step 3. The user executes clear to clear all entries. The clear command also calls Model#commitCarparkFinder(), causing another modified car park finder state to be saved into the carparkFinderStateList.
Figure 19 below shows a new state is created after the command clear is ran.

If a command fails its execution, it will not call Model#commitCarparkFinder(), so the car park finder state will not be saved into the carparkFinderStateList.
|
Step 4. The user now decides that adding the person was a mistake, and decides to undo that action by executing the undo command. The undo command will call Model#undoCarparkFinder(), which will shift the currentStatePointer once to the left, pointing it to the previous car park finder state, and restores the car park finder to that state.
Figure 20 below shows a new state is created after the command undo is ran. The state pointer is moved.
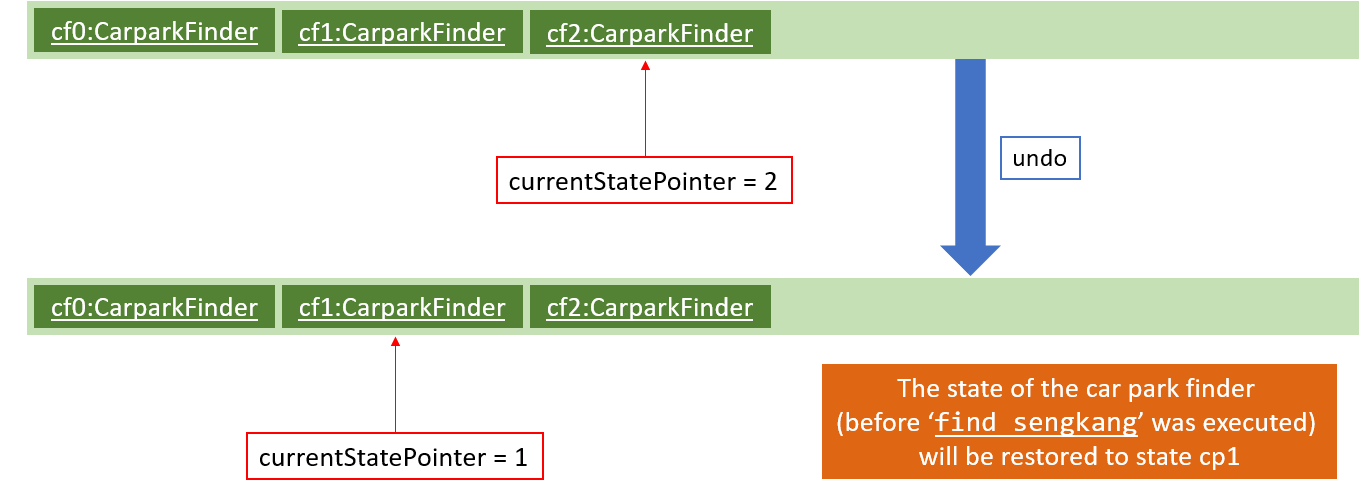
If the currentStatePointer is at index 0, pointing to the initial car park finder state, then there are no previous car park finder states to restore. The undo command uses Model#canUndoCarparkFinder() to check if this is the case. If so, it will return an error to the user rather than attempting to perform the undo.
|
Figure 21 below shows how the undo operation works.
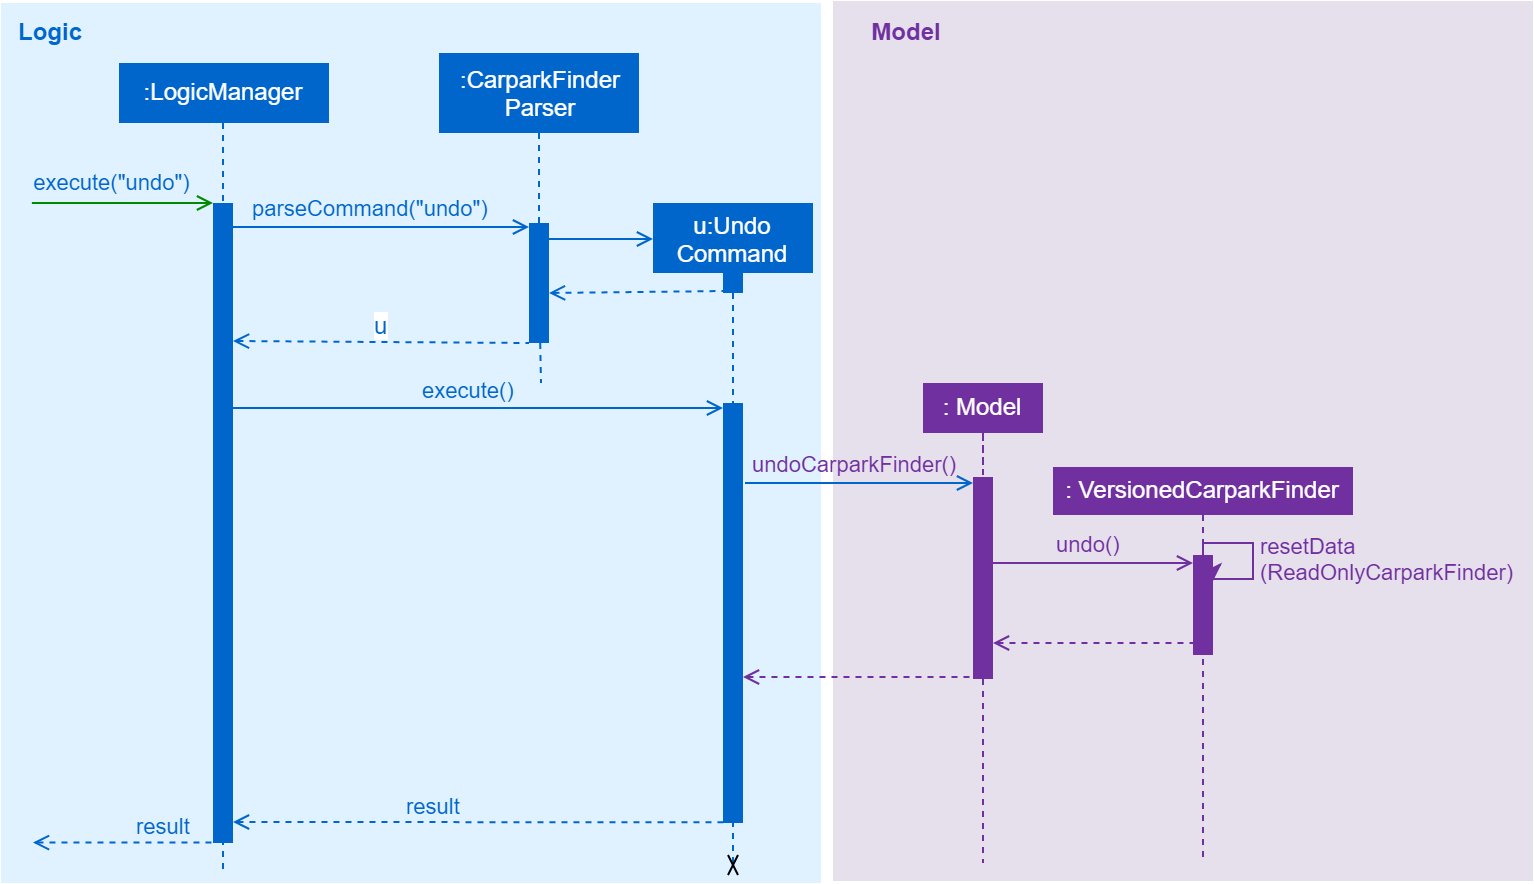
undo commandThe redo command does the opposite — it calls Model#redoCarparkFinder(), which shifts the currentStatePointer once to the right, pointing to the previously undone state, and restores the car park finder to that state.
If the currentStatePointer is at index carparkFinderStateList.size() - 1, pointing to the latest car park finder state, then there are no undone car park finder states to restore. The redo command uses Model#canRedoCarparkFinder() to check if this is the case. If so, it will return an error to the user rather than attempting to perform the redo.
|
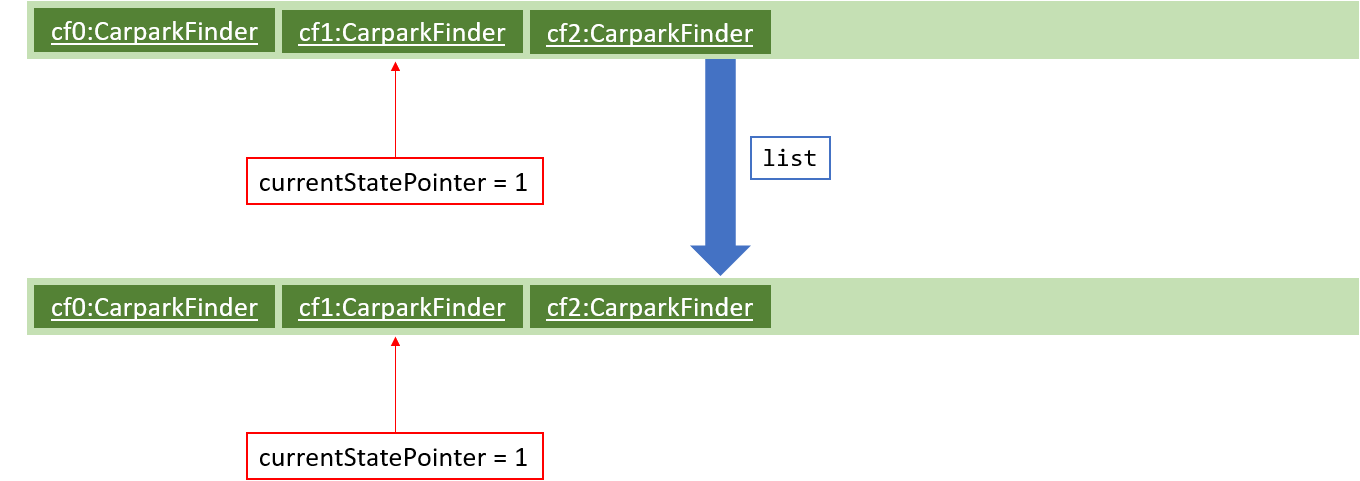
Step 5. The user then decides to execute the command list. Commands that do not modify the car park finder, such as list, will usually not call Model#commitCarparkFinder(), Model#undoCarparkFinder() or Model#redoCarparkFinder(). Thus, the carparkFinderStateList remains unchanged.
Figure 22 below showcases what happen when a command that does not modify the state is used.
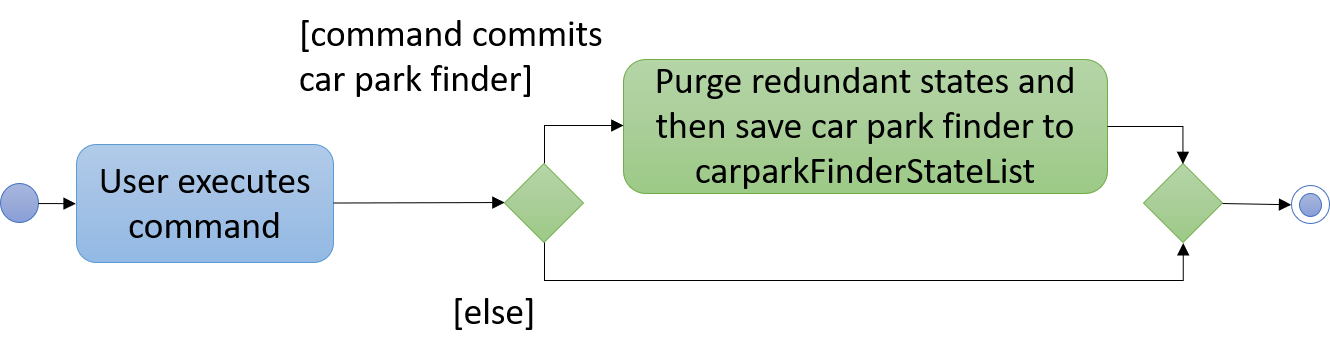
Step 6. The user executes clear, which calls Model#commitCarparkFinder(). Since the currentStatePointer is not pointing at the end of the carparkFinderStateList, all car park finder states after the currentStatePointer will be purged. We designed it this way because it no longer makes sense to redo the find sengkang command. This is the behavior that most modern desktop applications follow.
Figure 23 below showcases when a new command is used after an undo.
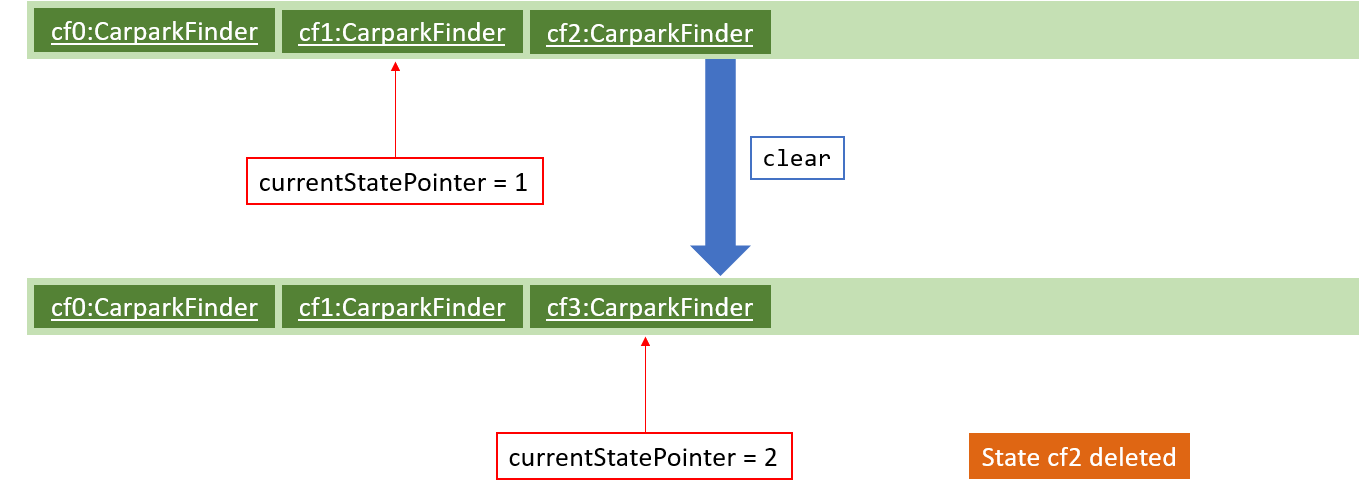
Figure 24 below summarises what happens when a user executes a new command:
4.6.2. Design Considerations
Aspect: How undo & redo executes
-
Alternative 1 (current choice): Save the entire car park finder.
Pros |
Easy to implement. |
Cons |
May have performance issues in terms of memory usage. |
-
Alternative 2: Individual command knows how to undo/redo by itself.
Pros |
Less memory usage (e.g. for |
Cons |
Need to ensure that the implementation of each individual command are correct. |
Aspect: Data structure to support the undo/redo commands
-
Alternative 1 (current choice): Use a list to store the history of car park finder states.
Pros |
Easy for new Computer Science student undergraduates to understand, who are likely to be the new incoming developers of our project. |
Cons |
Logic is duplicated twice. For example, when a new command is executed, we must remember to update both |
-
Alternative 2: Use
HistoryManagerfor undo/redo
Pros |
Need not to maintain a separate list and just reuse what is already in the codebase. |
Cons |
Requires dealing with commands that have already been undone: We must remember to skip these commands. Violates Single Responsibility Principle and Separation of Concerns as |
4.7. Abbreviation
The abbreviation feature reduces the amount of characters needed to type.
4.7.1. Overview
The abbreviation mechanism is facilitated by CarparkFinderParser. It extends the cases
to allow command abbreviations to be parsed through parseCommand as well.
4.7.2. Example
Given below is an example usage scenario and how the abbreviation mechanism behaves at each step.
Step 1. The user launches the application for the first time. The LogicManager
is initialized with an CarparkFinderParser.
Step 2. The user executes c command instead of calculate. The Matcher object in
CarparkFinderParser splits the command text into command word and
arguments, in which the command word is checked. Because it is an ambiguous abbrevation
(we do not know if it stands for clear or calculate), it is rejected by throwing a ParseException
Step 2. The user now tries s command instead of select. The Matcher object in
CarparkFinderParser again splits the command text into command word and
arguments, in which the command word is checked. This time, it is checked that the input string
is contained in one of the command words that is calculate. Therefore, it proceeds as if a
select command is given.
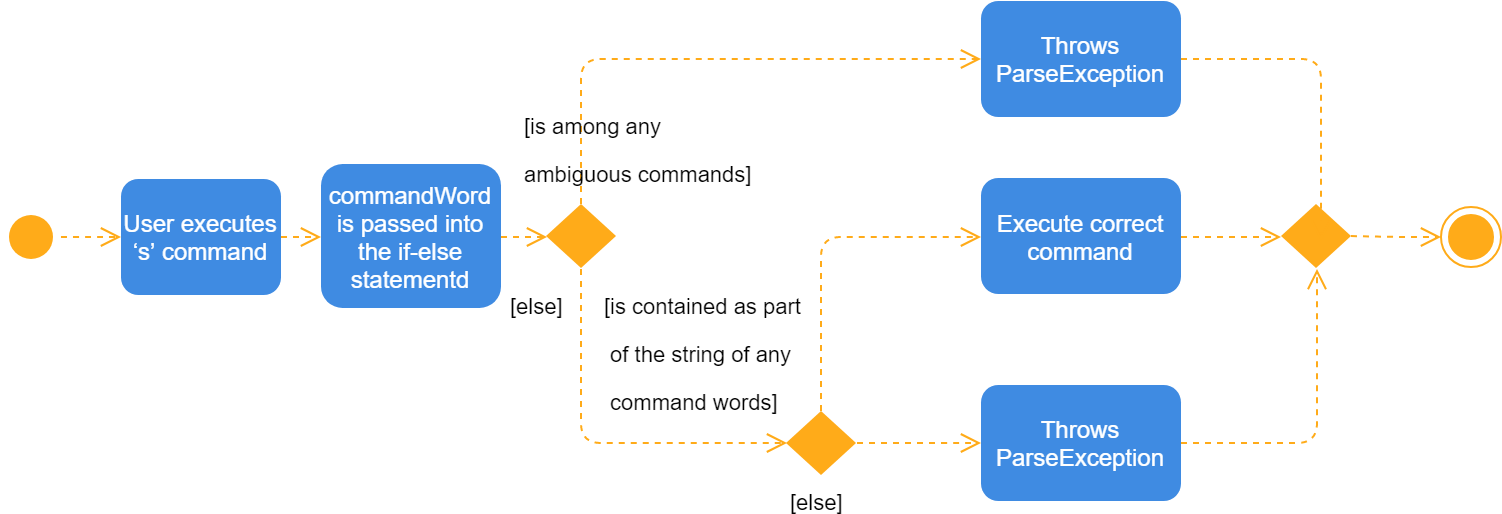
The Activity Diagram above explains what happens when a user executes a f
command.
4.7.3. Design Considerations
Aspect: How abbreviation executes
-
Alternative 1 (current choice): use input string to check if it is contained in any command word string
Pros
Extra logic needed
Cons
Very short command words that contains ambiguous abbreviation is marginalised in this case. For example, the shortest form of
findisfin, which makes not much of a difference. -
Alternative 2: (previous choice):* declare
COMMAND_ABBREVIATIONwith a string value in each Command file.Pros
Easy to implement
Cons
Have to decide on each abbreviation subjectively which brings down performance if there are a lot of commands
4.8. Autocomplete
The autocomplete feature simplifies overcomplicated commands by prompting correct format.
4.8.1. Overview
The autocomplete mechanism is facilitated by CommandBox. It calls autocomplete()
to displayFormat() if applicable command word is entered or to highlight the next
parameter if full format is already provided in the command box.
4.8.2. Example
Given below is an example usage scenario and how the autocomplete mechanism behaves at each step.
Step 1. The user launches the application for the first time.
Step 2. The user enters fi in command box and then presses Tab . autoComplete()
compares input through the list of applicable command words and abbreviations, and
proceeds to displayFormat() because fi is an ambiguous COMMAND, it fails with an exception.
Step 3. User tries with fil again. It passes as part of the autocomplete command filter
thus moves on to highlight its first placeholder, DAY, in the command line. As seen
from the following diagrams.

fil is entered.
Step 3. The user replaces DAY with an actual value, SUN, and presses 'Tab'
key again. autoComplete() is called again, but because this time it checks that input
isFilterCommandFormat, the next placeholder, START_TIME, is highlighted. Result
is shown in the following diagram.

Step 4. The user continues step 3 until all placeholders are filled up with actual values and then presses Enter to execute this command.
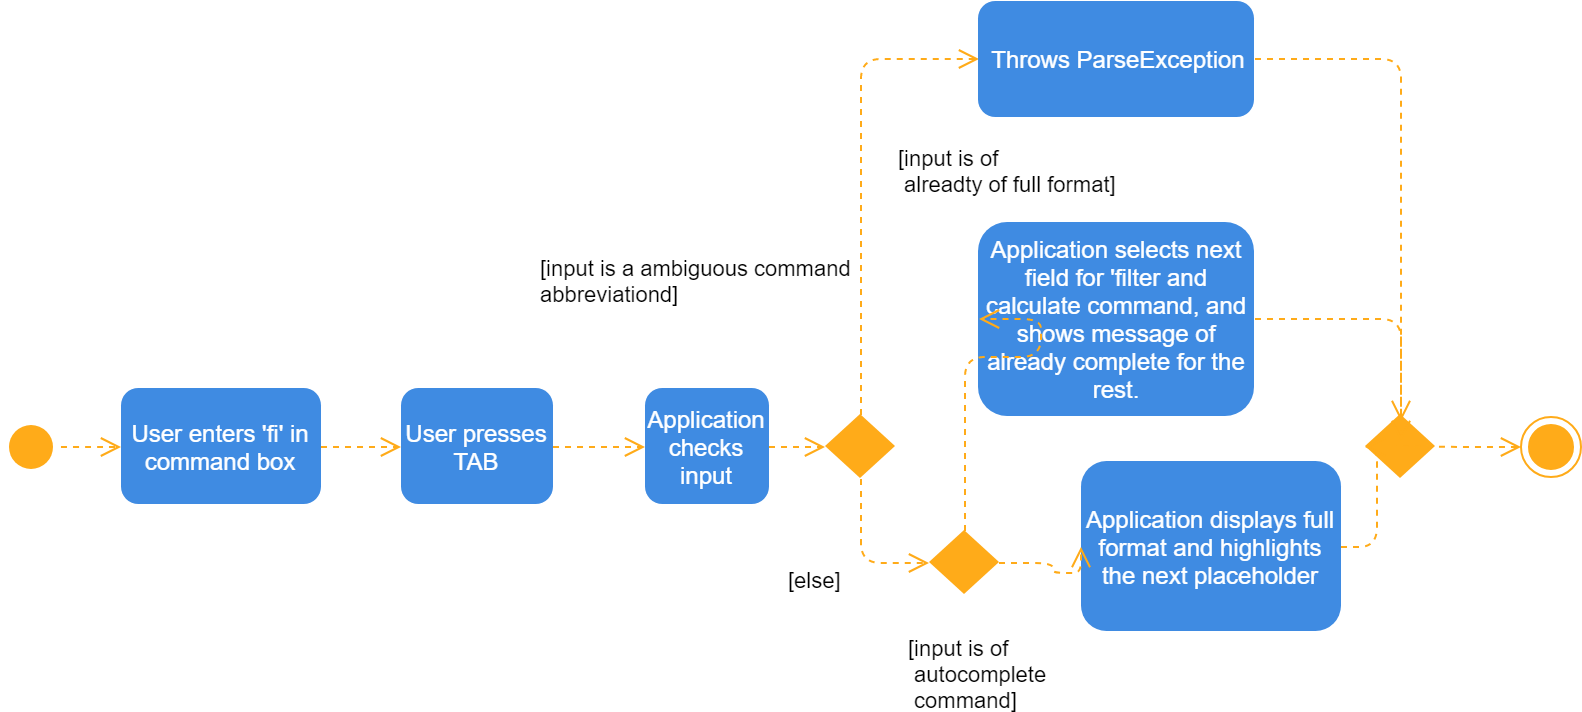
The Activity Diagram above explains what happens when user presses Tab.
4.8.3. Design Considerations
Aspect: TextInput
-
Alternative 1: (current choice): Continue to use the original TextField
Pros
External library enables bindAutocompletion for TextField (the drop down list of suggested commands that appears and updates itself as user types). External library enables bindAutocompletion for TextField (the drop down list of suggested commands that appears and updates itself as user types).
Cons
Text formatting is limited. All text in the TextField must have the same format.
-
Alternative 2: Create additional TextField as user request on additional fields
Pros
Allows for different formatting for different fields (Commands can have a different colour from the fields)
Cons
Original structure will be disrupted. Command box will no longer be single line text input, which have consequences such as the user cannot backspace or select through the entire line.
4.9. Logging
We are using java.util.logging package for logging. The LogsCenter class is used to manage the logging levels and logging destinations.
-
The logging level can be controlled using the
logLevelsetting in the configuration file (See Section 4.10) -
The
Loggerfor a class can be obtained usingLogsCenter.getLogger(Class)which will log messages according to the specified logging level -
Currently log messages are output through:
Consoleand to a.logfile.
Logging Levels
-
SEVERE: Critical problem detected which may possibly cause the termination of the application -
WARNING: Can continue, but with caution -
INFO: Information showing the noteworthy actions by the App -
FINE: Details that is not usually noteworthy but may be useful in debugging e.g. print the actual list instead of just its size
4.10. Configuration
Certain properties of the application can be controlled (e.g App name, logging level) through the configuration file (default: config.json).
4.11. Postal Code
The postal code feature is built to allow easier finding of car park by knowing the postal code they are searching for.
As the car park data from data.gov.sg does not have any postal code, we converted coordinates of each respective
car park to a postal code whenever possible.
4.11.1. Overview
Currently, postal code data are stored in a separate file. This is due to it being too slow and unreliable to convert coordinate to postal code in real time. However, in order to generate the file, we went through every car park and found their respective postal code.
4.11.2. Example
Step 1. The user launches the application.
Step 2. The system loads the file, postalcodeData.txt into a Hashmap<Long,String> using the GsonUtil#loadCarparkPostalCode() where the key is a hash and the value is a postal code.
Step 3. The system goes through every car park’s coordinates and hashes them together with GsonUtil#fnvHash(x,y) where x is the x-coordinate of the carpark and y is the y-coordinate of the carpark.
Step 4. If the key is found, it will return the value which is the postal code of the car park. If not, it will return the
default value 000000.
As certain car park do not have postal code, 000000 is the default value and a flag to show that the car park does not have a postal code.
|
4.11.3. Design Considerations
Aspect: Source of postal code information
-
Alternative 1 (Current choice): Pull data from file
Pros
Fast and efficient. No need to change due to no postal code changes.
Cons
Unable to update for new car parks. Requires user to download updated jar file.
-
Alternative 2: Pull data from API
Pros
Easy to update and scalable to new car parks.
Cons
Too slow to do in real time. Takes roughly 20 minutes to update all car park postal code. Not realistic and efficient to do in real time.
4.12. UI
It is a combination of JavaFX, HTML and CSS. This section describes the challenges faced, how it was overcome and an example of how it works.
4.12.1. Overview
Initially, we wanted to showcase real time updates when the user issues a command. This would mean updating the HTML accordingly. However, we did not want to just update it, we wanted to showcase the selected car park or the filtered list accordingly.
4.12.2. Example
Step 1. The user launches the application and is greeted by this UI.
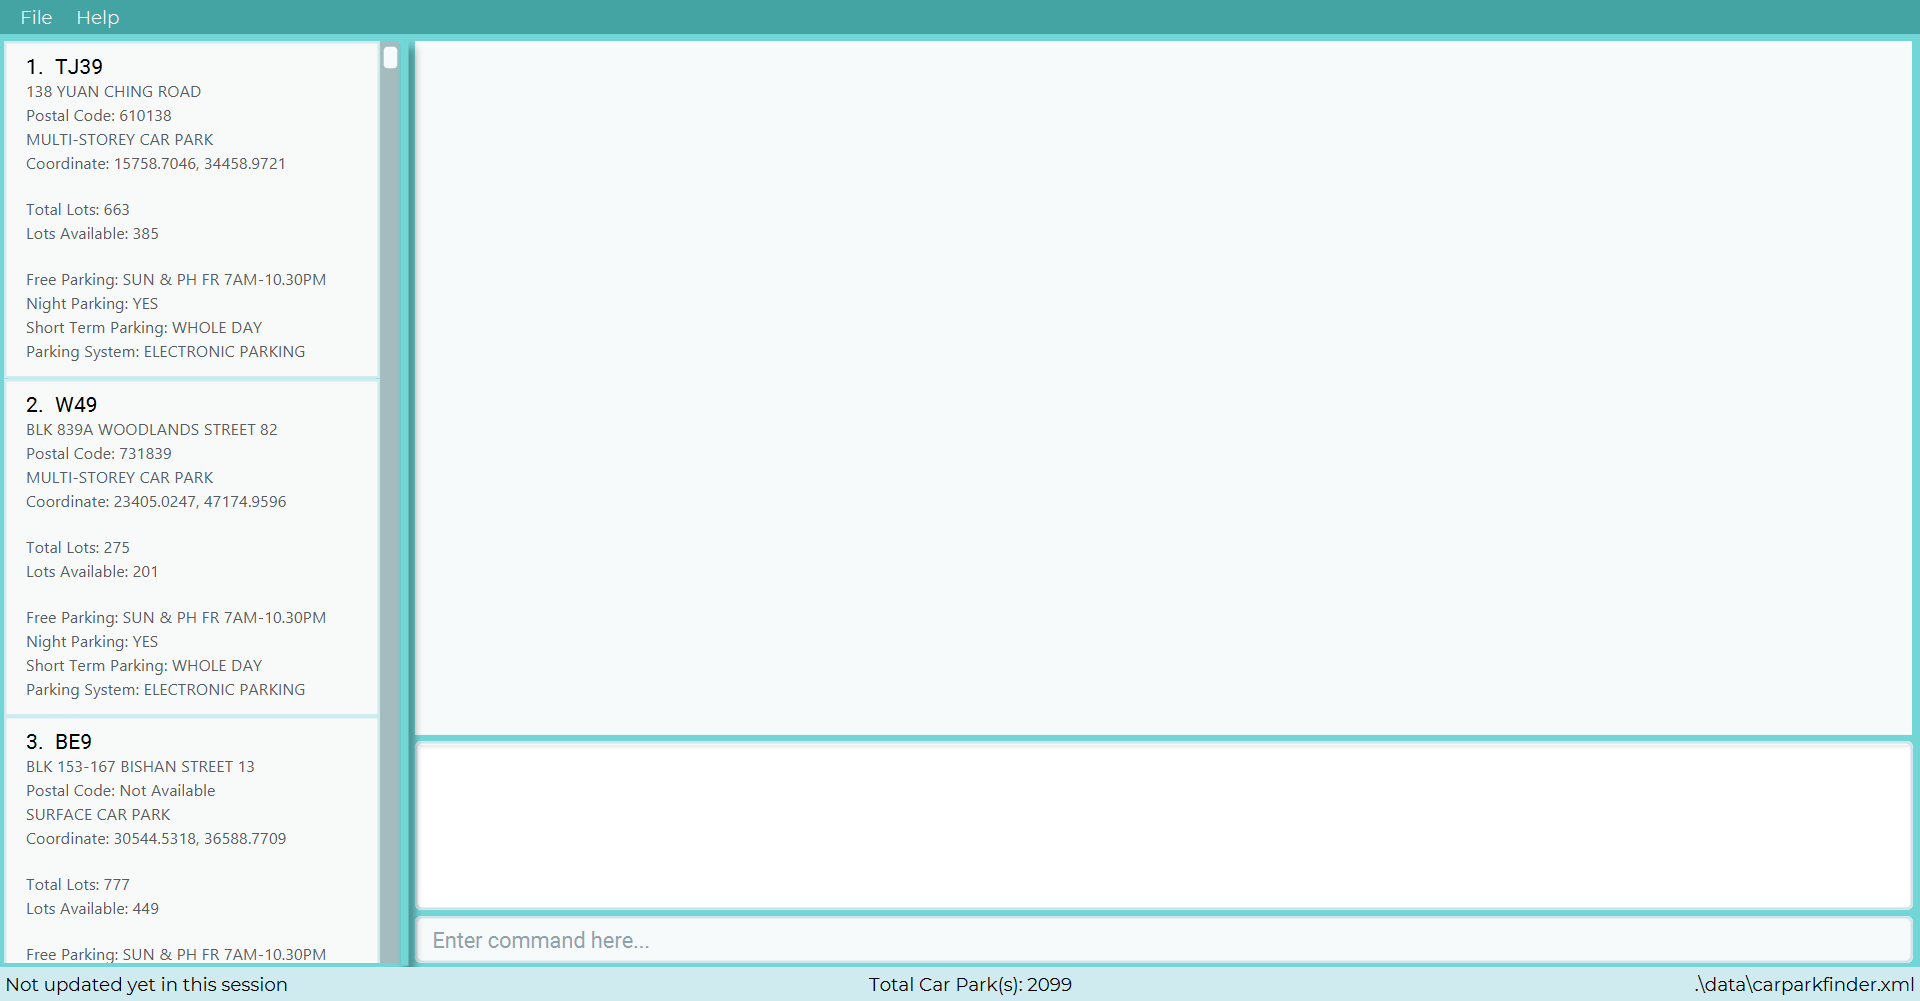
Step 2. The user selects a car park with a select command. E.g. select 10.
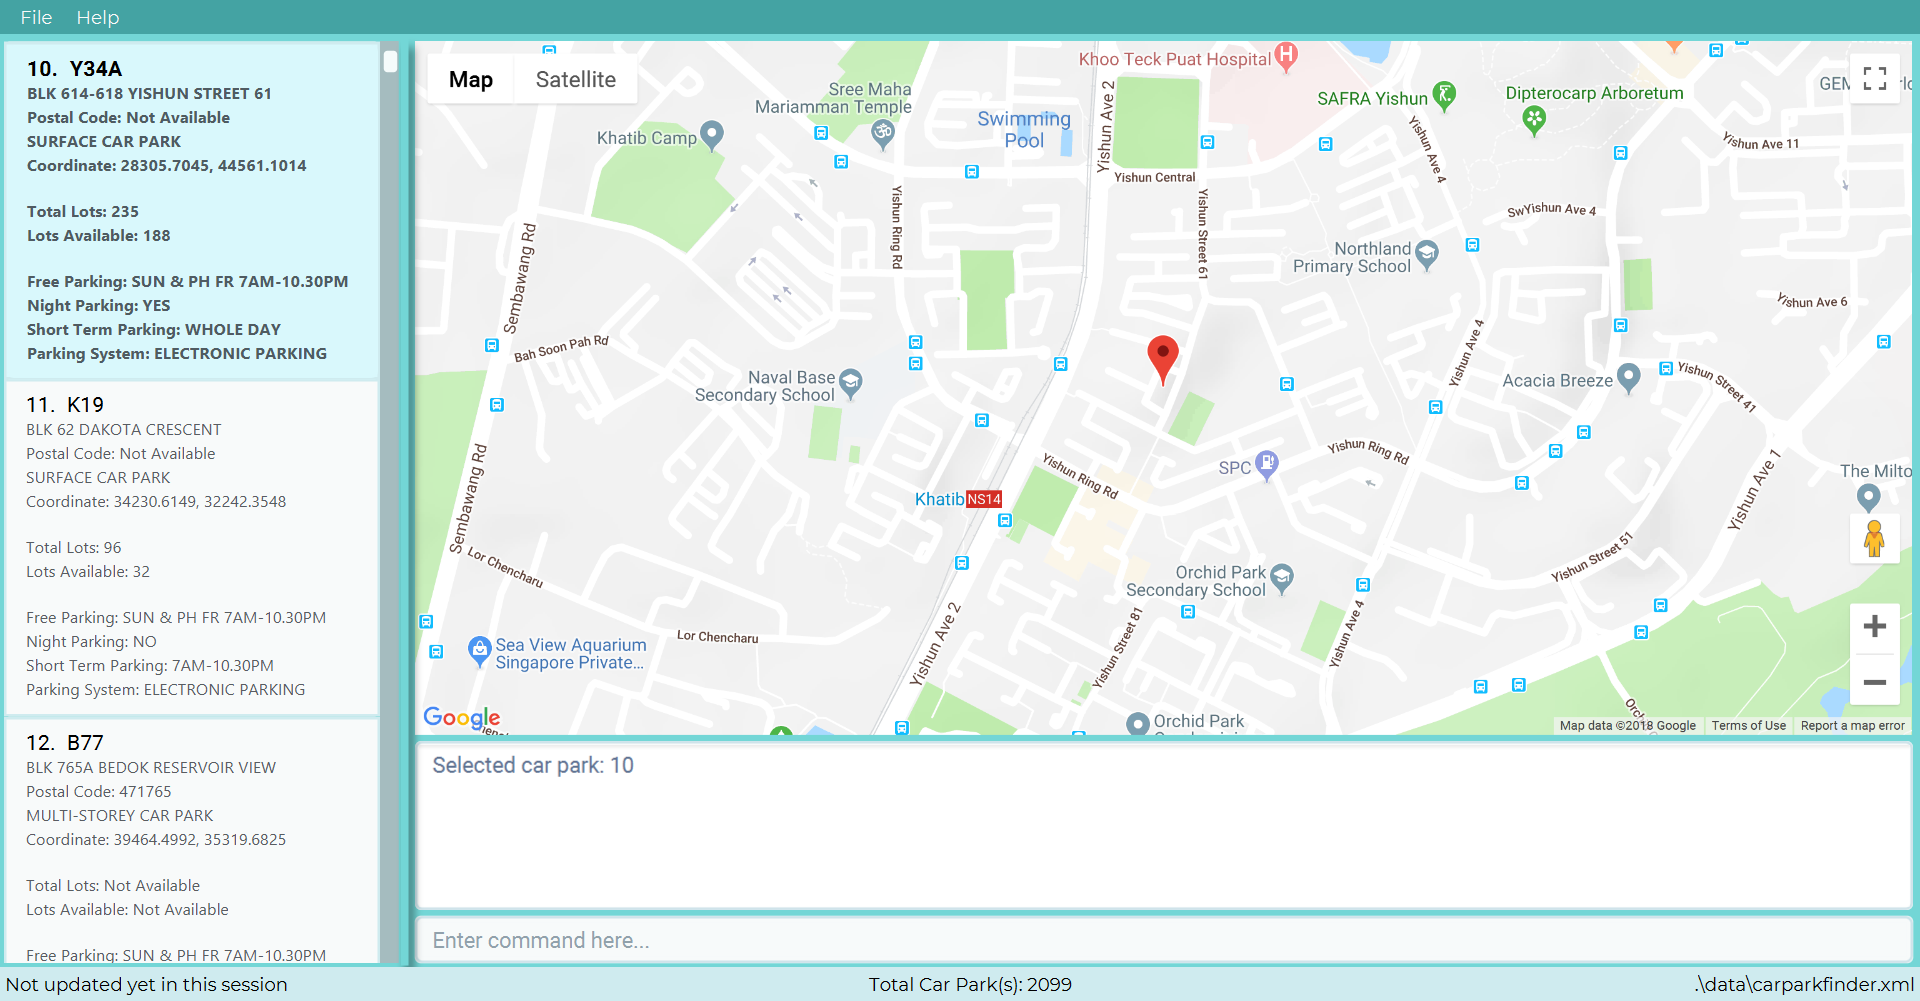
select 10 commandSelectCommand#Execute is called. If the input is valid, it creates a JumpToListRequestEvent event for BrowserPanel#handleCarparkPanelSelectionChangedEvent() to catch.
Step 3. The user then list all the car park with a list command.
A ListCarparkRequestEvent is created and BrowserPanel catches the event to call BrowserPanel#handleListCarparkRequestEvent()
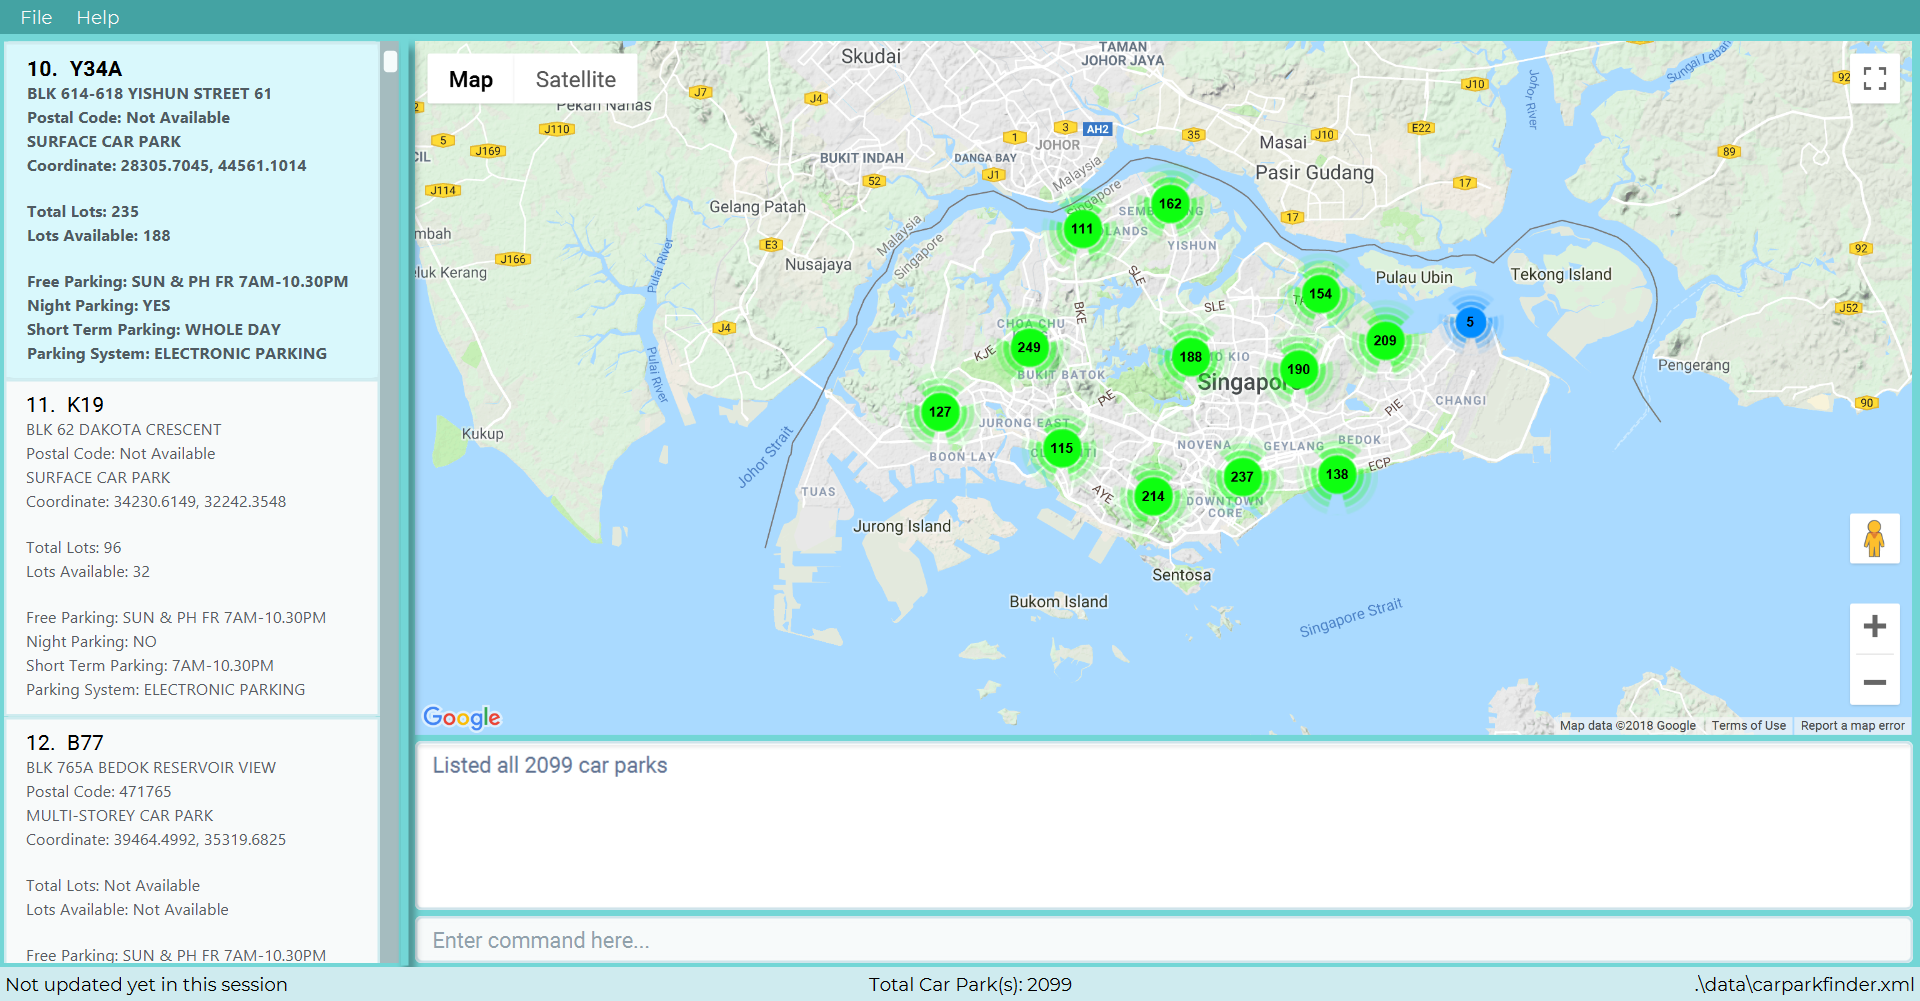
list commandThe HTML is refreshed to show all car parks.
4.12.3. Design Considerations
Aspect: HTML/CSS/JS design choices
-
Alternative 1 (Current choice): Have a callback function in javascript
Pros
Easy to implement google maps and stylesheet.
Cons
Hard to test. Different rendering between devices.
-
Alternative 2: Have a query in the url parameters to filter data and update iFrame
Pros
No rendering issue. Easy to test and debug.
Cons
Complex query and hard to understand again once working. Server must allow filtering by url paramters.
4.13. [Proposed] Weather Forecast
When notification is enabled, the user is able to check the weather forecast for the area. This is to warn them if the car park they chose is not sheltered.
This feature is coming in v2.0.
4.14. [Proposed] Data Encryption
The car park data and user data will be encrypted to prevent users from editing and manipulating them.
4.14.1. Overview
The data encryption mechanism works by encrypting the information by a unique key generated by every users individual system. The key will stored in a secured location to prevent people from accessing it.
The two main files it will encrypt are:
-
Car park information
-
User’s favorites
4.14.2. Example
This feature is coming in v2.0.
5. Documentation
We use asciidoc for writing documentation.
| We chose asciidoc over Markdown because asciidoc, although a bit more complex than Markdown, provides more flexibility in formatting. |
5.1. Editing Documentation
See Using Gradle to learn how to render .adoc files locally to preview the end result of your edits.
Alternatively, you can download the AsciiDoc plugin for IntelliJ, which allows you to preview the changes you have made to your .adoc files in real-time.
5.2. Publishing Documentation
See Using Travis to learn how to deploy GitHub Pages using Travis.
5.3. Converting Documentation to PDF format
We use Google Chrome for converting documentation to PDF format, as Chrome’s PDF engine preserves hyperlinks used in webpages.
Here are the steps to convert the project documentation files to PDF format.
-
Follow the instructions in Using Gradle to convert the AsciiDoc files in the
docs/directory to HTML format. -
Go to your generated HTML files in the
build/docsfolder, right click on them and selectOpen with→Google Chrome. -
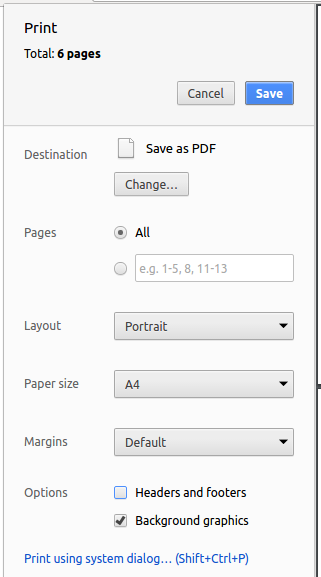
Within Chrome, click on the
Printoption in Chrome’s menu. -
Set the destination to
Save as PDF, then clickSaveto save a copy of the file in PDF format. For best results, use the settings indicated in the screenshot below.
5.4. Site-wide Documentation Settings
The build.gradle file specifies some project-specific
asciidoc attributes which affects how all documentation files within this project are rendered.
Attributes left unset in the build.gradle file will use their default value, if any.
|
| Attribute name | Description | Default value |
|---|---|---|
|
The name of the website. If set, the name will be displayed near the top of the page. |
not set |
|
URL to the site’s repository on GitHub. Setting this will add a "View on GitHub" link in the navigation bar. |
not set |
|
Define this attribute if the project is an official SE-EDU project. This will render the SE-EDU navigation bar at the top of the page, and add some SE-EDU-specific navigation items. |
not set |
5.5. Per-file Documentation Settings
Each .adoc file may also specify some file-specific
asciidoc attributes which affects how the file is rendered.
Asciidoctor’s built-in attributes may be specified and used as well.
Attributes left unset in .adoc files will use their default value, if any.
|
| Attribute name | Description | Default value |
|---|---|---|
|
Site section that the document belongs to.
This will cause the associated item in the navigation bar to be highlighted.
One of: * Official SE-EDU projects only |
not set |
|
Set this attribute to remove the site navigation bar. |
not set |
5.6. Site Template
The files in docs/stylesheets are the
CSS stylesheets of the site.
You can modify them to change some properties of the site’s design.
The files in docs/templates controls the rendering of .adoc files into HTML5.
These template files are written in a mixture of Ruby and Slim.
|
Modifying the template files in |
6. Testing
Testing is done to verify the application is running in its intended behavior. This section covers multiple ways to run test using Gradle, Gradle (Headless) and Intellij JUnit.
6.1. Running Tests
There are three ways to run tests.
| The most reliable way to run tests is the 3rd one. The first two methods might fail some GUI tests due to platform/resolution-specific idiosyncrasies. |
Method 1: Using IntelliJ JUnit test runner
-
To run all tests, right-click on the
src/test/javafolder and chooseRun 'All Tests' -
To run a subset of tests, you can right-click on a test package, test class, or a test and choose
Run 'ABC'
Method 2: Using Gradle
-
Open a console and run the command
gradlew clean allTests(Mac/Linux:./gradlew clean allTests)
| See Using Gradle for more info on how to run tests using Gradle. |
Method 3: Using Gradle (headless)
Thanks to the TestFX library we use, our GUI tests can be run in the headless mode. In the headless mode, GUI tests do not show up on the screen. That means the developer can do other things on the Computer while the tests are running.
To run tests in headless mode, open a console and run the command gradlew clean headless allTests (Mac/Linux: ./gradlew clean headless allTests)
6.2. Types of tests
We have two types of tests:
-
GUI Tests - These are tests involving the GUI. They include,
-
System Tests that test the entire App by simulating user actions on the GUI. These are in the
systemtestspackage. -
Unit tests that test the individual components. These are in
seedu.parking.uipackage.
-
-
Non-GUI Tests - These are tests not involving the GUI. They include,
-
Unit tests targeting the lowest level methods/classes.
e.g.seedu.parking.commons.StringUtilTest -
Integration tests that are checking the integration of multiple code units (those code units are assumed to be working).
e.g.seedu.parking.storage.StorageManagerTest -
Hybrids of unit and integration tests. These test are checking multiple code units as well as how the are connected together.
e.g.seedu.parking.logic.LogicManagerTest
-
6.3. Troubleshooting Testing
Problem: HelpWindowTest fails with a NullPointerException.
-
Reason: One of its dependencies,
HelpWindow.htmlinsrc/main/resources/docsis missing. -
Solution: Execute Gradle task
processResources.
7. Dev Ops
Dev Ops ensure the product runs on both Linux and Windows by building it and testing after it is uploaded to Github.
7.1. Build Automation
See Using Gradle to learn how to use Gradle for build automation.
7.2. Continuous Integration
We use Travis CI and AppVeyor to perform Continuous Integration on our projects. See Using Travis and Using AppVeyor for more details.
7.3. Coverage Reporting
We use Coveralls to track the code coverage of our projects. See Using Coveralls for more details.
7.4. Documentation Previews
When a pull request has changes to asciidoc files, you can use Netlify to see a preview of how the HTML version of those asciidoc files will look like when the pull request is merged. See Using Netlify for more details.
7.5. Making a Release
Here are the steps to create a new release.
-
Update the version number in
MainApp.java. -
Generate a JAR file using Gradle.
-
Tag the repo with the version number. e.g.
v0.1 -
Create a new release using GitHub and upload the JAR file you created.
7.6. Managing Dependencies
A project often depends on third-party libraries. For example, Car Park Finder depends on the
Jackson library for XML parsing.
Managing these dependencies can be automated using Gradle. For example, Gradle can download the dependencies
automatically, which is better than these alternatives.
a. Include those libraries in the repo (this bloats the repo size)
b. Require developers to download those libraries manually (this creates extra work for developers)
Appendix A: Product Scope
Target user profile:
-
commutes using a car and needs to find an empty parking lot
-
wants to know specific details of a car park in a certain location
-
prefers desktop apps over other types
-
can type fast
-
prefers typing over mouse input
-
is reasonably comfortable using CLI apps
Value proposition: helping busy car owners plan their trip by getting details of nearby car parks from their destination in a fast and efficient manner
Appendix B: User Stories
Priorities: High (must have) - * * *, Medium (nice to have) - * *, Low (unlikely to have) - *
Filter
| Priority | As a … | I want to … | So that I can… |
|---|---|---|---|
|
car owner |
know if there is night parking at the car park |
park my car at night |
|
driver |
find out if there is free parking at a car park at a certain time on a specific day |
choose to park at a car park for free |
|
driver |
find out the type of parking of a certain car park |
decide if I should leave my car there |
Search
| Priority | As a … | I want to … | So that I can… |
|---|---|---|---|
|
car owner |
know more details about the car park and its lots |
decide where to go depending on the information provided |
|
driver |
find a list of available parking lots within my destination |
plan which car park location is convenient for me |
|
car owner |
search by details of a car park |
view information about a car park that I want |
Store and Load Favourites
| Priority | As a … | I want to … | So that I can… |
|---|---|---|---|
|
car owner |
have a list of destinations that I visit often |
save time as I do not have to retype my commands |
|
user |
add a car park to my favourites |
create an organised list of preferred car parks |
|
user |
view my favourite list with ease at the start |
glance through the car parks without using commands |
|
user |
save a list of destinations like a favourite list |
add and keep track of preferred car parks |
|
user |
edit and write remarks about car parks in my favourite list |
add or update new information about specific car parks |
|
user |
delete car parks from my favourites |
remove car parks that are no longer of my interest |
API and Notifications
| Priority | As a … | I want to … | So that I can… |
|---|---|---|---|
|
car owner |
receive notifications about car park availability |
save time and plan my trip accordingly to vacancy of parking lots |
|
driver |
set how frequent to notify me about more suitable car parks |
change which car park I am headed to without searching again |
|
driver |
know if the car park is changed to fully occupied |
go to another car park that is not full |
|
driver |
check the current weather forecast at destination |
plan ahead if the car park has no shelter and move to one that has it |
Cache and Aliases
| Priority | As a … | I want to … | So that I can… |
|---|---|---|---|
|
new user |
learn how to use the application easily |
spend less time on learning and more on using it |
|
new user |
be able to understand the UI without much instruction |
spend my time on the program using the features |
|
user |
use shorthand equivalent abbreviation of commands |
navigate the application in a more time efficient way |
|
user |
autocomplete my requests |
get the information that I want faster |
Appendix C: Use Cases
For all use cases below, the System is the Car Park Finder and the Actor is the
user / driver / car owner, unless specified otherwise.
Filter and Sorting
| Use case: UC01 - Filter car park |
|---|
MSS
|
Extensions
|
| Use case: UC02 - Sort car park |
|---|
MSS
|
Extensions
|
| Use case: UC03 - Calculate parking fee |
|---|
MSS
|
Extensions
|
Search and Flag
| Use case: UC04 - Search car park |
|---|
MSS
|
Extensions
|
| Use case: UC05 - Flag car park details |
|---|
MSS
|
Extensions
|
Store and Load Favourites
| Use case: UC06 - Add car park to Favourites |
|---|
MSS
|
Extensions
|
| Use case: UC07 - Delete car park in Favourites |
|---|
MSS
|
Extensions
|
| Use case: UC07 - Delete car park in Favourites |
|---|
MSS
|
Extensions
|
| Use case: UC08 - List Favourites |
|---|
MSS
|
Extensions
|
| Use case: UC09 - Tags and remarks |
|---|
MSS
|
Extensions
|
API and Notifications
| Use case: UC10 - Receive notifications |
|---|
Preconditions: Actor already requested a list of car parks MSS
|
Extensions
|
| Use case: UC11 - Car park fully occupied |
|---|
Preconditions: Actor already selected a car park from the list MSS
|
Extensions
|
| Use case: UC12 - Weather update |
|---|
Preconditions:
MSS
|
Extensions
|
Cache and Aliases
| Use case: UC13 - View instructions |
|---|
MSS
|
Extensions
|
| Use case: UC14 - Command abbreviation |
|---|
MSS
|
Extensions
|
| Use case: UC15 - Autocomplete command |
|---|
MSS
|
Appendix D: Non Functional Requirements
Non-functional requirements specify the constraints under which system is developed and operated.
Table 4 below contains all of the Non-functional requirements for Car Park Finder in no particular order.
Should work on any mainstream OS as long as it has Java |
Should not have any noticeable sluggishness when holding list of car parks. |
Should come with automated unit tests and be able to handle errors and exceptions. |
Should be easy to use for novice that have never used a CLI before or never used an application to search for locations of car parks. |
Query should respond fast assuming no connection delays and the API is working. |
The application is not expected to download an entire list of car parks in the country to work offline. |
This application is not suppose to be used by drivers on the road. |
The system should be easy and scalable in adding on features for future versions. |
The car park data should be updated frequently while running to send notifications in real time. |
Privacy details in the favourites list should not be seen or shared easily by others. |
Appendix E: Glossary
If you do not understand a technical term used in this document, refer to Table 5 below.
| Term | Explanation |
|---|---|
Application Programming Interface (API) |
Specifies the interface through which other programs can interact with a software component. It is a contract between the component and its clients. |
Autocomplete |
Provides suggestions while you type into the field. |
Cascading Style Sheets (CSS) |
A style sheet language used for describing the presentation of a document written in a markup language like HTML. |
Favourites |
A custom list of car parks that is meant to be viewed easily. |
Flag |
Flag is a value that acts as a check for the filter feature. |
Google Maps |
It is a online map service provided by Google. |
Hyper Text Markup Language (HTML) |
A standardized system for tagging text files to achieve font, colour, graphic, and hyperlink effects on World Wide Web pages. |
Javascript (JS) |
A high-level, interpreted programming language. It is a language which is also characterized as dynamic, weakly typed, prototype-based and multi-paradigm. |
Mainstream Operating System (OS) |
Windows, Linux, Unix and OS-X are operating systems used widely in the world. |
Marker |
This is should in the Google Maps to indicate the location of the car park. You can click on it to either zoom in or display more information. |
User Interface (UI) |
Allows the user to interact with the application through inputs and outputs of data. |
Appendix F: Instructions for Manual Testing
Given below are instructions to test Car Park Finder manually. These instructions only provide a starting point for testers to work on; testers are expected to do more exploratory testing.
F.1. Launch and Shutdown
-
Initial launch
-
Download the jar file and copy into an empty folder
-
Double-click the jar file
Expected: Shows the GUI with a set of sample contacts. The window size may not be optimum.
-
-
Saving window preferences
-
Resize the window to an optimum size. Move the window to a different location. Close the window.
-
Re-launch the app by double-clicking the jar file.
Expected: The most recent window size and location is retained.
-
F.2. Car park features
-
Finding car park
-
Type into the command box a
findcommand
Expected: A list of car parks to be updated, GUI to scale accordingly to number of car parks.
-
-
Selecting car park
-
Type into the command box a
selectcommand
Expected: One car park to be selected on the left side, GUI to only show the one car park.
-
-
Listing all car parks
-
Type into the command box a
listcommand
Expected: All car parks are shown on the left hand menu, GUI to show overview of singapore
-
-
Clearing all car parks
-
Type into the command box a
clearcommand
Expected: All car parks on the left hand menu is now deleted. GUI to show nothing. No data to saved when re launched.
-
-
Undoing a command
-
Type into the command box a
findcommand -
Type into the command box a
undocommand
Expected: Thefindcommand is now deleted. You should see what you previously saw before thefindcommand.
-
-
Redoing a command
-
Type into the command box a
findcommand -
Type into the command box a
undocommand -
Type into the command box a
redocommand
Expected: Thefindcommand is now shown, as theundohas been reversed.
-
-
Filter car parks
-
Type into the command box a
findcommand -
Type into the command box a
filtercommand
Expected: Thefiltercommand reduces the number of car parks down even further.
-
-
Calculating the cost of a car park
-
Type into the command box a
selectcommand -
Type into the command box a
calculatecommand
Expected: Thecalculatecommand returns you a number which is the cost of the parking time at the car park
-
-
Notifying you on updates of a car park
-
Type into the command box a
selectcommand -
Type into the command box a
notifycommand
Expected: The `notify ` command will flash to show that it is updating
-
-
Querying for all the car parks
-
Type into the command box a
querycommand
Expected: All the car parks on the left hand side has been updated. The GUI is also refreshed to show all car parks.
-
F.3. Saving data
-
Dealing with missing/corrupted data files
-
Delete all the files expect the jar file
-
Re launch the app Expected: No data will be shown, have to run
queryagain.
-
-
Auto saving
-
Run the application
-
Type into the command box a
querycommand -
Close the application
-
Re launch the application
Expected: All the data have been saved locally and you do not need to run thequerycommand again.
-
F.4. General features
-
Looking for instructions
-
Type into the command box a
helpcommand
Expected: You are greeted by a page which showcase our user guide
-
-
Looking for history
-
Type several commands into the command box
-
Type into the command box a
historycommand
Expected: The command box now shows a list of the past commands that you previously entered.
-